Windows Presentation Foundation, also popularly known as WPF, is a popular UI framework for building Windows applications. Since its launch in 2006, it has gained popularity, and many apps running on Windows these days benefit from its features. Due to easy interoperability with Win32 APIs and backward compatibility, WPF is still a popular choice.
Building a WPF video calling app with Dyte SDK will be a two-step process. To use the same features available on Dyte SDK, we will use the Web Components and render those in WPF applications. To achieve this, in the first step, we will create a Web App with Dyte SDK, and in the second step, we will use Microsoft Edge WebView2 to integrate the web app and render Dyte video calls.
This will give us the best of both worlds. The awesomeness of WPF and developer-friendly live video SDK from Dyte! The complete sample with two projects is available on GitHub here.
Let’s begin to write some code!
Step 1: Building a Web App
Create a Web Application using any tool that allows you to create an HTML file and run it on Live Server! In our sample, we are calling it ‘solution-webapp’
In the HTML, refer to Dyte Web Components SDK and define custom elements:
<script type="module">
	import { defineCustomElements } from 'https://cdn.jsdelivr.net/npm/@dytesdk/ui-kit/loader/index.es2017.js';
	defineCustomElements();
</script>
<script src='https://cdn.dyte.in/core/dyte.js'></script>
Once you refer to the SDKs, you should be able to create a dyte-meeting component that can render the meeting on the browser.
<div>
   <dyte-meeting id="my-meeting" />
</div>
Initializing a meeting, joining the meeting, and getting notified whenever some event occurs e.g., recording status changes or someone joining or leaving a meeting, can be done using the following script.
<script>
        //Pass roomName and authToken as query string parameters to this web page to join the meeting
        const searchParams = new URL(window.location.href).searchParams;
        const authToken = searchParams.get('authToken');
        //Initialize DyteClient -> A Dyte Meeting
        DyteClient.init({
            authToken
        }).then((meeting) => {

        //Join the meeting room
        meeting.joinRoom();
        //Set participant tile to self i.e. display your own video in participant view
        document.getElementById('my-meeting').meeting = meeting;
        });
</script>
The last two lines are important.
meeting.joinRoom();
This line of code will join the meeting and add or admit current participants (bearing the authToken) into the meeting.
document.getElementById('my-meeting').meeting = meeting;
This line of code will set the current ongoing meeting to the dyte-meeting component we created before.
You can run this HTML file using Live Server and test it.
Introducing Microsoft Edge WebView2
Microsoft Edge uses the popular Chromium engine under the hood. It provides the same features and rendering capabilities as Chrome or other browsers. Apart from that, Microsoft has added features to improve productivity and performance on top of it. Microsoft Edge WebView2 is a component or control that brings the same Chromium experience to WPF apps. Navigate to WebView2 - Microsoft Edge Developer and install the latest version.
Step 2: Building a WPF Video Calling App
To build a WPF app, you’ll need a Visual Studio setup. You can use different versions or editions and get started with it. Navigate to File > New > Project and create a new WPF app.

Give this project a name; we’ve used ‘solution-wpfapp’ in the current sample. Use the .NET 6 or 7 version.
Refer NuGet Package
Now we need to refer to WebView2 in this project. Click on Project > Manage NuGet Packages and search for Edge WebView 2 control. Once found, install it:

Once the NuGet package is added, we can use Microsoft Edge WebView2 in our application.
Refer to Component & Design UI
Let’s create ExamWindow as a separate XAML Window and add a reference to the added package.
xmlns:wpf="clr-namespace:Microsoft.Web.WebView2.Wpf;assembly=Microsoft.Web.WebView2.Wpf"Using the WebView2 component will be the same as using any other component.
<wpf:WebView2 Name="ParticipantWebView" Width="600" Height="300" Margin="20" DefaultBackgroundColor="AliceBlue" />
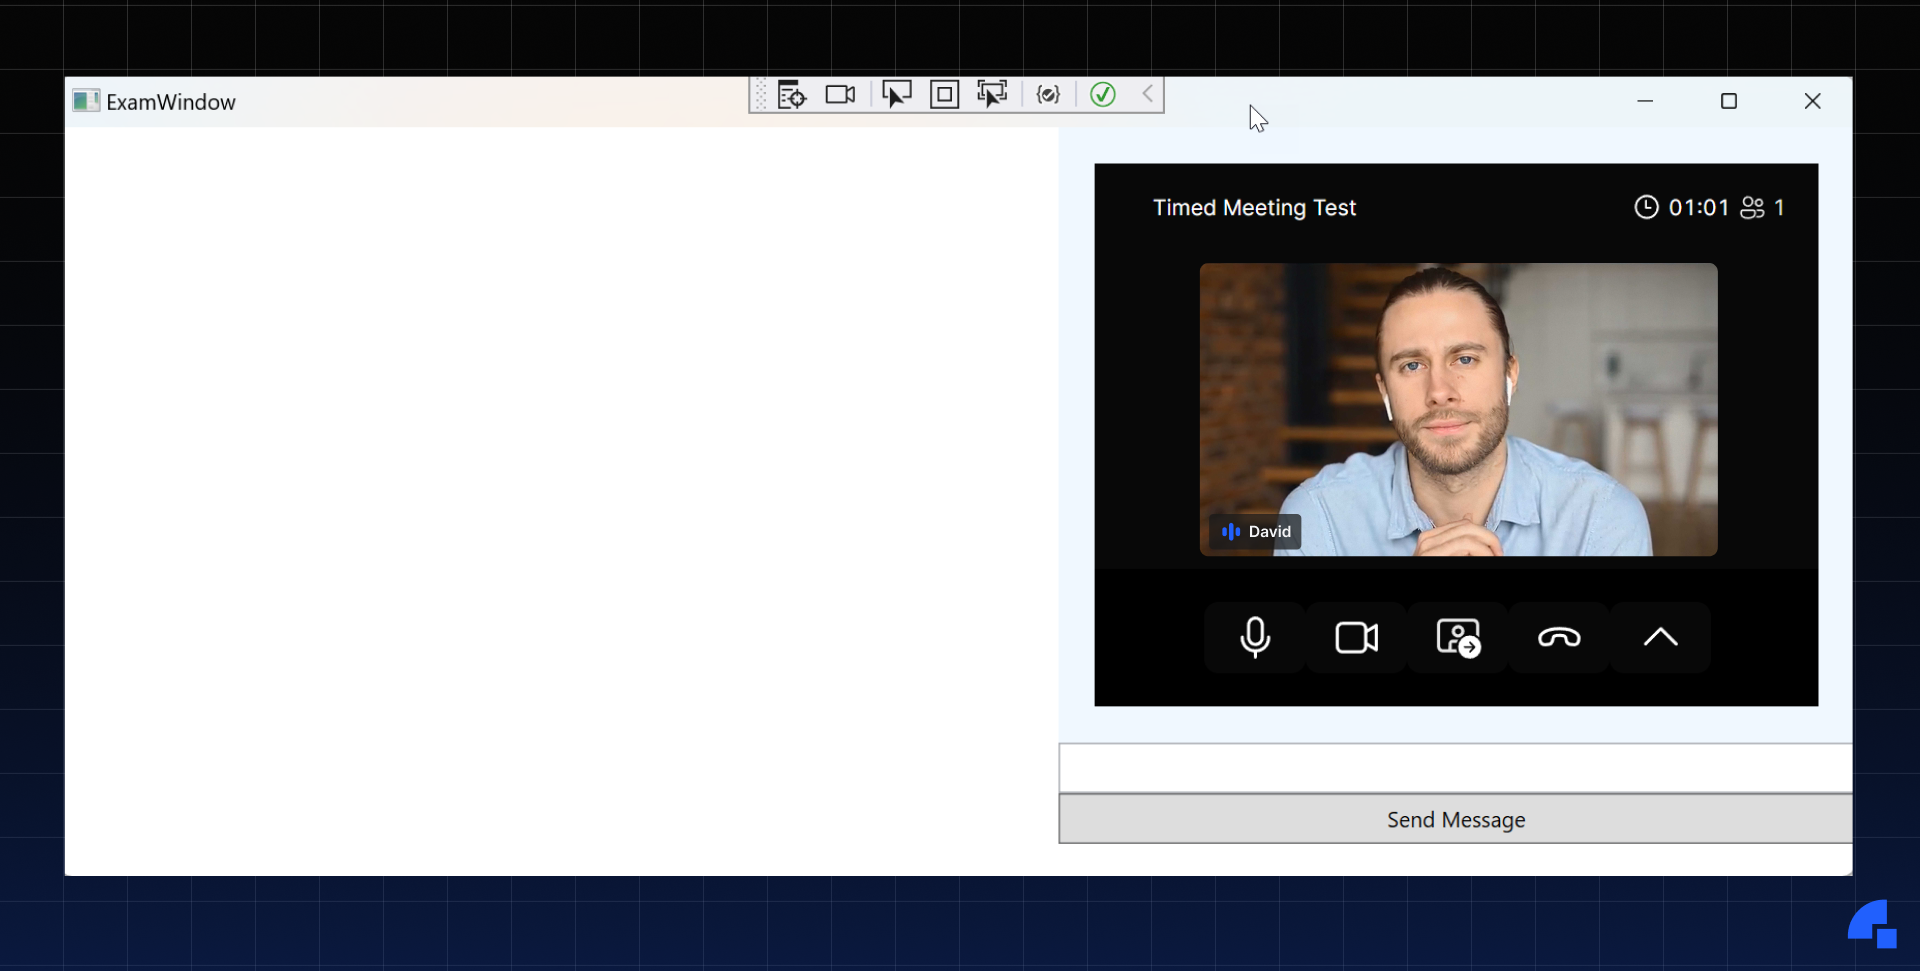
We will use the following layout for this sample. However, feel free to design your interface as per your requirement.

Just like we Initialise DyteMeeting, we need to Initialise the ExamWindow - a XAML window in the WPF app. We do so using the following code snippet.
public ExamWindow()
{
     InitializeComponent();
     Loaded += ExamWindowLoaded;
     InitializeAsync();
}
We also need to Initialise the Edge WebView2 component, which we do in the code snippet as displayed below.
async void InitializeAsync()
{
     await ParticipantWebView.EnsureCoreWebView2Async(null);
}
When the ExamWindow is Loaded, we set the HTML page URL we created and launched in Step 1. And we also pass the authToken so that a participant is added to the meeting.
private void ExamWindowLoaded(object sender, RoutedEventArgs e)
{
     var host = string.Empty;        //Example: http://127.0.0.1:5500";
     var url = string.Empty;         //Example: index.html;
     var authToken = string.Empty;   //Example: eyJhbGciOiJSUzI1NiIsInR5cCI6IkpXVCJ9.eyJpZCI6IjViMDZkNmY4LWM2M2YtNDA5Ny05ZmYwLTU4NzdmZmJmOTFiZiIsImxvZ2dlZEluIjp0cnVlLCJpYXQiOjE2NzIwMjc4NzksImV4cCI6MTY4MDY2Nzg3OX0.rvme95rRweh8ntafl042wMITiYQ4DLNuApHlarDg8A-4qU5r2q1Lg-B7Ev3rOWerXnhrlr0bIHC7wSq9gGBmfLhJvNJn3mtS1ief004YfpKpxAfnOhkVk8oRAcgBrmJxhVEZuxPQvD3--aEbdkRctqHo9z0JfZCnE2PaCPDa2uYOQhf4sFfORGfbTjPtdjs3FsR2gmSIu-nY0hHW3uStfuccA7s04gXy7-u9yVr18ibOColszxe4EONRyfV2uiouXZutCD_T6u9YMukk3RxkmK5LI7eFzWsc_gUmrpUahKoThmvh8PeiHwOSzWJd-BsJFHHPpKe0ivQIhg;
     var source = new Uri(string.Concat(host, "/", url, "?", "&authToken=", authToken));
     ParticipantWebView.Source = new Uri(source.ToString());
}
Wiring Events & Setup Communication
In this video calling app sample, we would want to send events to WPF app e.g. when someone joins a meeting or when the recording starts or a meeting ends. Similarly, we would like to send chat messages as well. To accomplish this, we will use events exposed by WebView in the browser and subscribe to those events in the WPF app.
Let’s modify HTML to incorporate those events. We will add the following code snippet before we call joinRoom();
//Attach meeting object to window object of the browser
window.meeting = meeting;
//Subscribe to events emitted by Dyte meeting.
meeting.recording.on('recordingUpdate', (e) => {
	window.chrome.webview?.postMessage("recordingUpdate:" + e);
});
meeting.self.on('roomJoined', () => {
	window.chrome.webview?.postMessage("roomJoined");
});
meeting.self.on('roomLeft', () => {
	window.chrome.webview?.postMessage("roomLeft");
});
meeting.chat.on('chatUpdate', ({ message, messages }) => {
	window.chrome.webview?.postMessage(message);
});
Once we set up these event handlers, the event will send messages to the WPF app and we need to subscribe to those. We also want to send messages to the Web from WPF. So, let’s add the following event subscriptions to the constructor.
ParticipantWebView.WebMessageReceived += ParticipantWebViewWebMessageReceived;So, whenever an event is raised, the WPF app will receive a message and it will be displayed in a MessageBox.
private void ParticipantWebViewWebMessageReceived(object? sender, Microsoft.Web.WebView2.Core.CoreWebView2WebMessageReceivedEventArgs e)
{
     MessageBox.Show(e.WebMessageAsJson);
}
Lastly, we want to send chat messages to the meeting, we will do so when the button is clicked.
Before that, let’s add a Button and a TextBox in UI
<TextBox Name="ChatMessage" Padding="5"/>
<Button Name="SendMessage" Padding="5"> Send Message </Button>
Now, we can wire up the button clicked event which will send a chat message in a meeting.
private void SendMessageClick(object sender, RoutedEventArgs e)
{
 	 ParticipantWebView.ExecuteScriptAsync($"meeting.chat.sendTextMessage('{ChatMessage.Text}');");
}
That’s pretty much what the app is all about.
Testing this app is again a 2-step process.
Step 1: Make sure the solution-webapp is running. Note down the URL. If the URL is different, make note of it and make changes in the WPF app.
Step 2: launch the WPF app.
Conclusion
With Microsoft Edge WebView2 control, we can bring Dyte video calling to WPF apps and still use the richness of the framework. And there you have it — your own WPF video calling app built using the Dyte SDK. Do check out the sample available here: https://github.com/dyte-io/wpf-samples