Flutter, unlike native Android, iOS, or even React Native apps, does not use system drawing primitives for rendering your application. This blog will give you all the theory of how, what, and why of using Flutter PlatformViews and how WebRTC(lib) VideoTracks can be rendered in your Flutter applications using PlatformViews.
Background
Before we start our discussion on how PlatformViews are rendered, let's discuss how Flutter generally draws its UI.
Flutter paints its UI from scratch every time using its graphics engine, Impeller. Flutter draws every pixel on the screen, giving developers a high degree of control over the UI.
Flutter uses 3 threads to render its UIs.
- UI thread
- Platform thread
- Raster thread
The UI thread is where your Dart code runs. The Platform thread is responsible for creating widgets, calculating the layout, and other layout-related tasks. Once this is done, the layout tree is delegated to the Raster thread, which converts the tree into actual pixels on the screen.
// Dart code runs on the UI thread
void main() {
  runApp(MyApp());
}
Let’s see how this fits with our use case of making video available from the native side to Flutter.
WebRTC connection
There are multiple ways through which you can render your libwebrtc video tracks on Flutter, like for Android, you can
- Use
SurfaceTextureRendererto render the VideoTrack, make the Texture available to Flutter using TextureRegistry API, and render the Texture in Flutter. - Use
SurfaceViewRendererto render the VideoTrack as an AndroidView, and use PlatformViews to use the native view in Flutter.
In this blog are going to talk about how the 2nd approach works under the hood. Specifically, what and why of PlatformViews.
What are Flutter PlatformViews?
PlatformViews are used when we want to use native views as a Flutter widget. There are two ways we can create PlatformView in Flutter.
1. Hybrid composition
In Hybrid composition, Flutter creates a special type of view and asks Android/iOS to create a corresponding view and embeds the native view into its own widget tree.
Below is how you can implement PlatformViews by using the Hybrid composition method -
Widget build(BuildContext context) {
  // This is used in the platform side to register the view.
  const String viewType = '<platform-view-type>';
  // Pass parameters to the platform side.
  const Map<String, dynamic> creationParams = <String, dynamic>{};

  return PlatformViewLink(
    viewType: viewType,
    surfaceFactory:
        (context, controller) {
      return AndroidViewSurface(
        controller: controller as AndroidViewController,
        gestureRecognizers: const <Factory<OneSequenceGestureRecognizer>>{},
        hitTestBehavior: PlatformViewHitTestBehavior.opaque,
      );
    },
    onCreatePlatformView: (params) {
      return PlatformViewsService.initSurfaceAndroidView(
        id: params.id,
        viewType: viewType,
        layoutDirection: TextDirection.ltr,
        creationParams: creationParams,
        creationParamsCodec: const StandardMessageCodec(),
        onFocus: () {
          params.onFocusChanged(true);
        },
      )
        ..addOnPlatformViewCreatedListener(params.onPlatformViewCreated)
        ..create();
    },
  );
}
Here's a breakdown of what each part does:
1. Variables initialization:
viewTypeis a unique identifier for the native view. This should match the identifier used in the native Android code.creationParamsis a map that can hold any parameters you want to pass to the native view for its initialization.
2. PlatformViewLink widget:
- This widget serves as a bridge between the Flutter framework and the native view. It takes in the
viewTypeand two factory functions:surfaceFactoryandonCreatePlatformView.
3. surfaceFactory function:
- This function returns an
AndroidViewSurfacewidget, which is responsible for displaying the native Android view. - It takes a
controllerargument, an instance ofAndroidViewController, which is used to control the native Android view. gestureRecognizersspecifies which gestures the native view should consume. In this example, it's set to an empty set, meaning the native view won't consume any gestures.hitTestBehavioris set toPlatformViewHitTestBehavior.opaque, which means the native view will block touches to underlying Flutter widgets.
4. onCreatePlatformView function:
- This function initializes the native Android view and returns an instance of it.
- It uses
PlatformViewsService.initSurfaceAndroidViewto initialize the native view, passing in various parameters likeid,viewType, andcreationParams. - An
onFocuscallback is also defined, which is triggered when the native view gains focus. - A listener is added to notify when the Android view is created successfully.
By using this build method in your Flutter app, you can seamlessly integrate a native Android view into your Flutter widget tree.
2. Virtual display mode
In virtual display mode, Flutter creates an offscreen android.view.Surface, which is a drawing surface to render graphics. It’s like a blank canvas. Then the native view renders its content onto this surface. Flutter then takes the content of that surface and uses it as a texture within its rendering pipeline. This texture is drawn where the platform view should appear.
iOS only supports Hybrid composition.
Below is how you can implement virtual display mode.
Widget build(BuildContext context) {
  // This is used in the platform side to register the view.
  const String viewType = '<platform-view-type>';
  // Pass parameters to the platform side.
  final Map<String, dynamic> creationParams = <String, dynamic>{};

  return AndroidView(
    viewType: viewType,
    layoutDirection: TextDirection.ltr,
    creationParams: creationParams,
    creationParamsCodec: const StandardMessageCodec(),
  );
}
AndroidView widget:
- This widget is used to display the native Android view within the Flutter app.
- It takes several parameters:
viewTypespecifies the type of Android view to create.layoutDirectionsets the text direction, which is left-to-right (TextDirection.ltr) in this example.creationParamsare the initial parameters to pass to the Android view.creationParamsCodecspecifies how to encodecreationParams. TheStandardMessageCodecis used for encoding basic types like strings, numbers, and collections.
Native implementation
On the native side, we need to create the view that we need to serve, create a factory, and register it so that the native platform can create views whenever it is asked by Flutter.
To do this in Android we do -
class NativeViewFactory : PlatformViewFactory(StandardMessageCodec.INSTANCE) {
    override fun create(context: Context, viewId: Int, args: Any?): PlatformView {
        val creationParams = args as Map<String?, Any?>?
        return NativeView(context, viewId, creationParams)
    }
}
Next, we have to register this factory in the flutter engine -
binding.platformViewRegistry
                .registerViewFactory("<platform-view-type>", NativeViewFactory())
Performance Impact
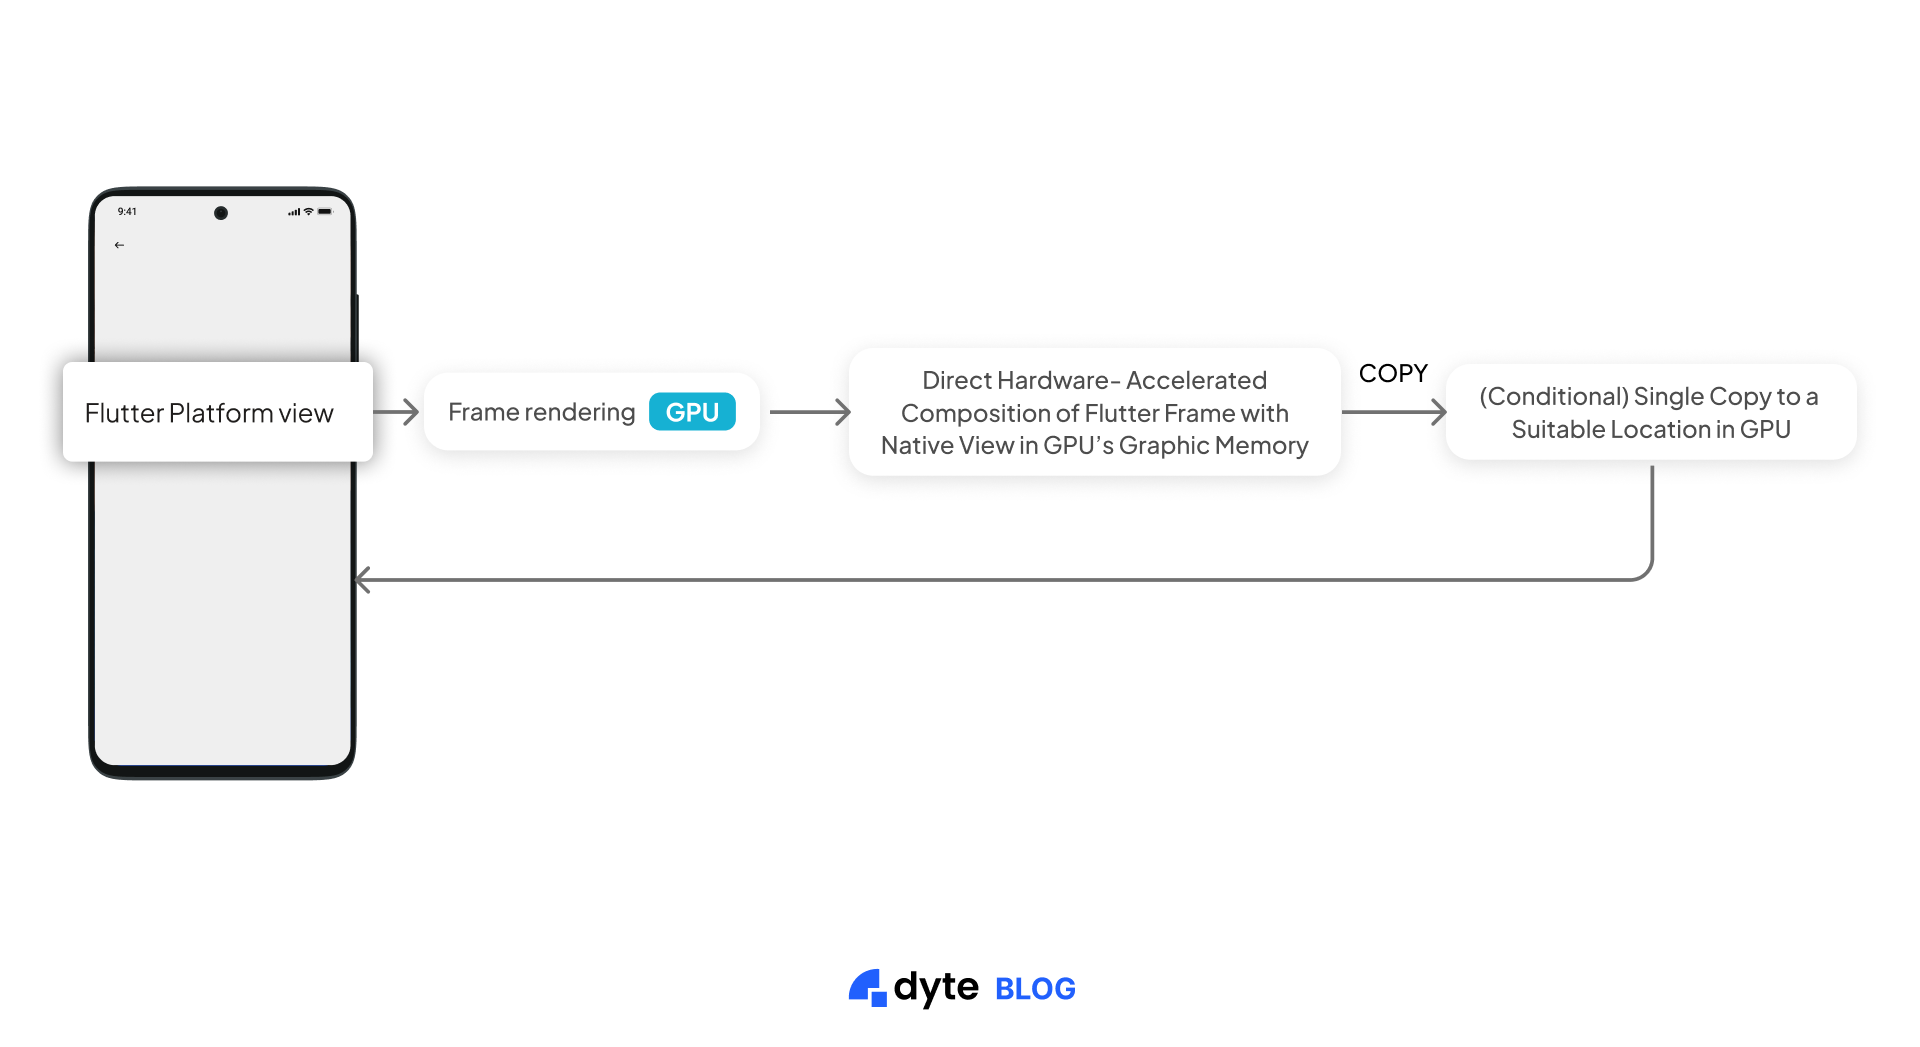
Before Android 10, hybrid composition required a lot of to and fro between main memory and GPU to compose native views with flutter widgets, after Android 10, copying is done only once, which makes it very performant.
Before Android 10
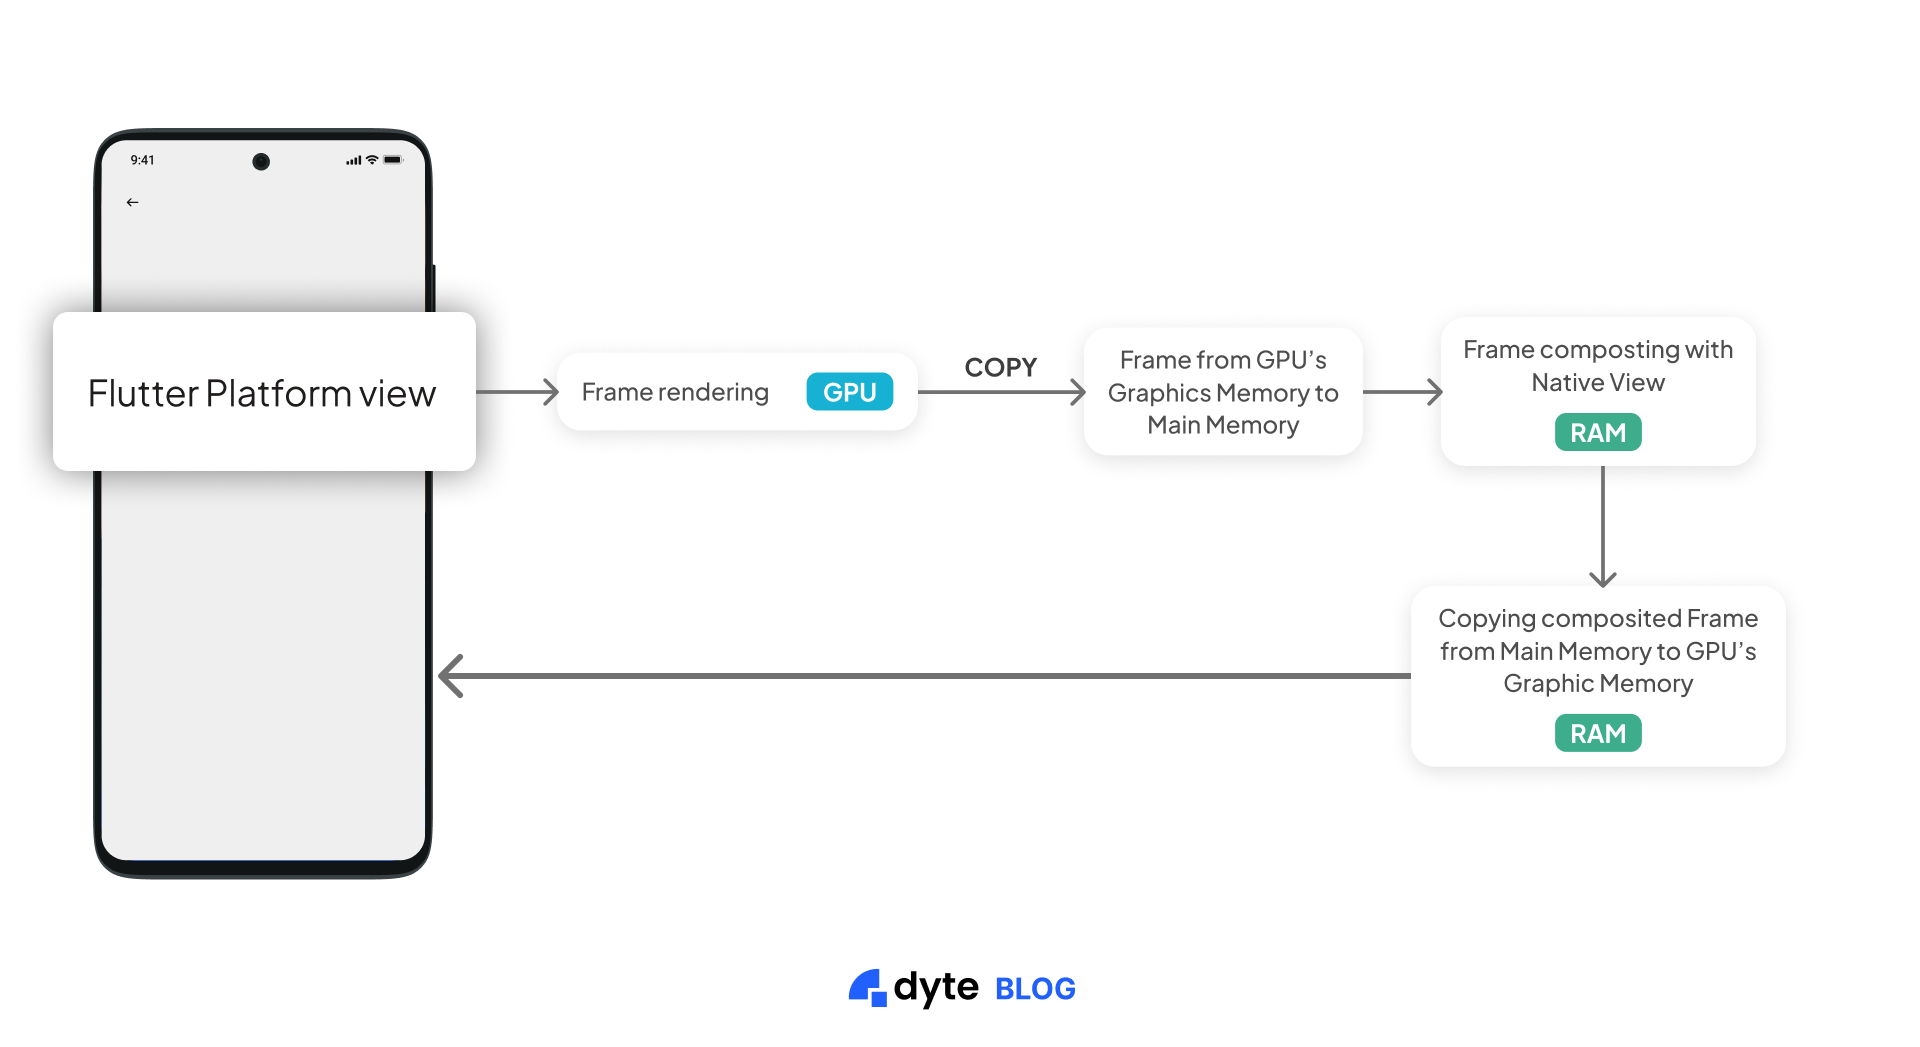
After Android 10:
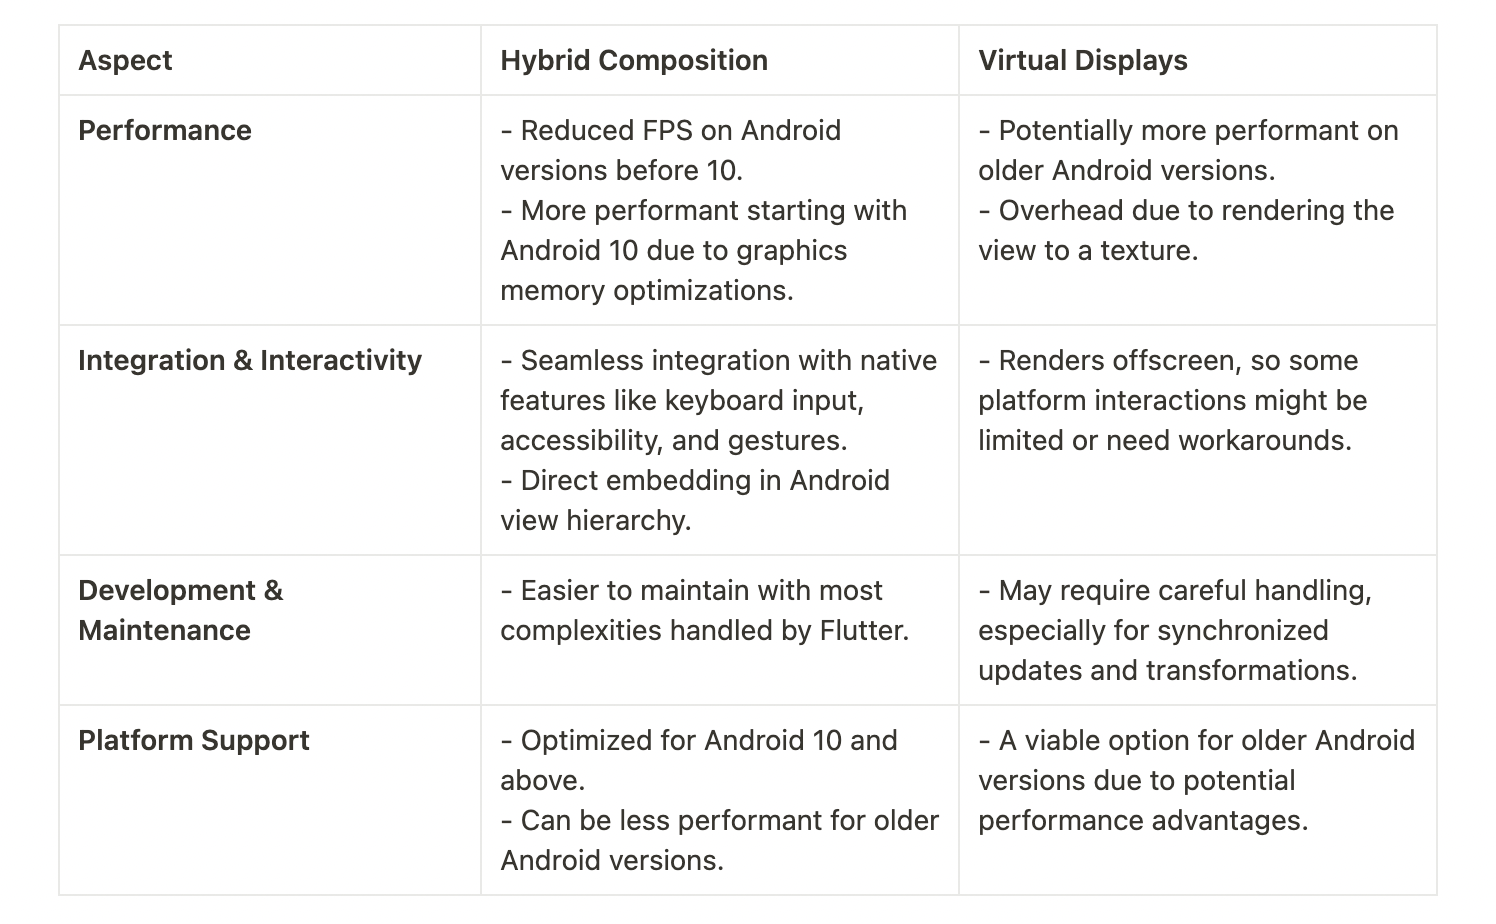
Here is a small table that can help you decide which method to choose:
What did we choose at Dyte?
At Dyte, our Flutter SDK is a wrapper over the Android and iOS SDKs, and we don't load any WebRTC video/audio streams directly. We use VideoView from our Android SDK to display the video, which is then served as a PlatformView. We prefer a hybrid composition due to its performance benefits.
Challenges
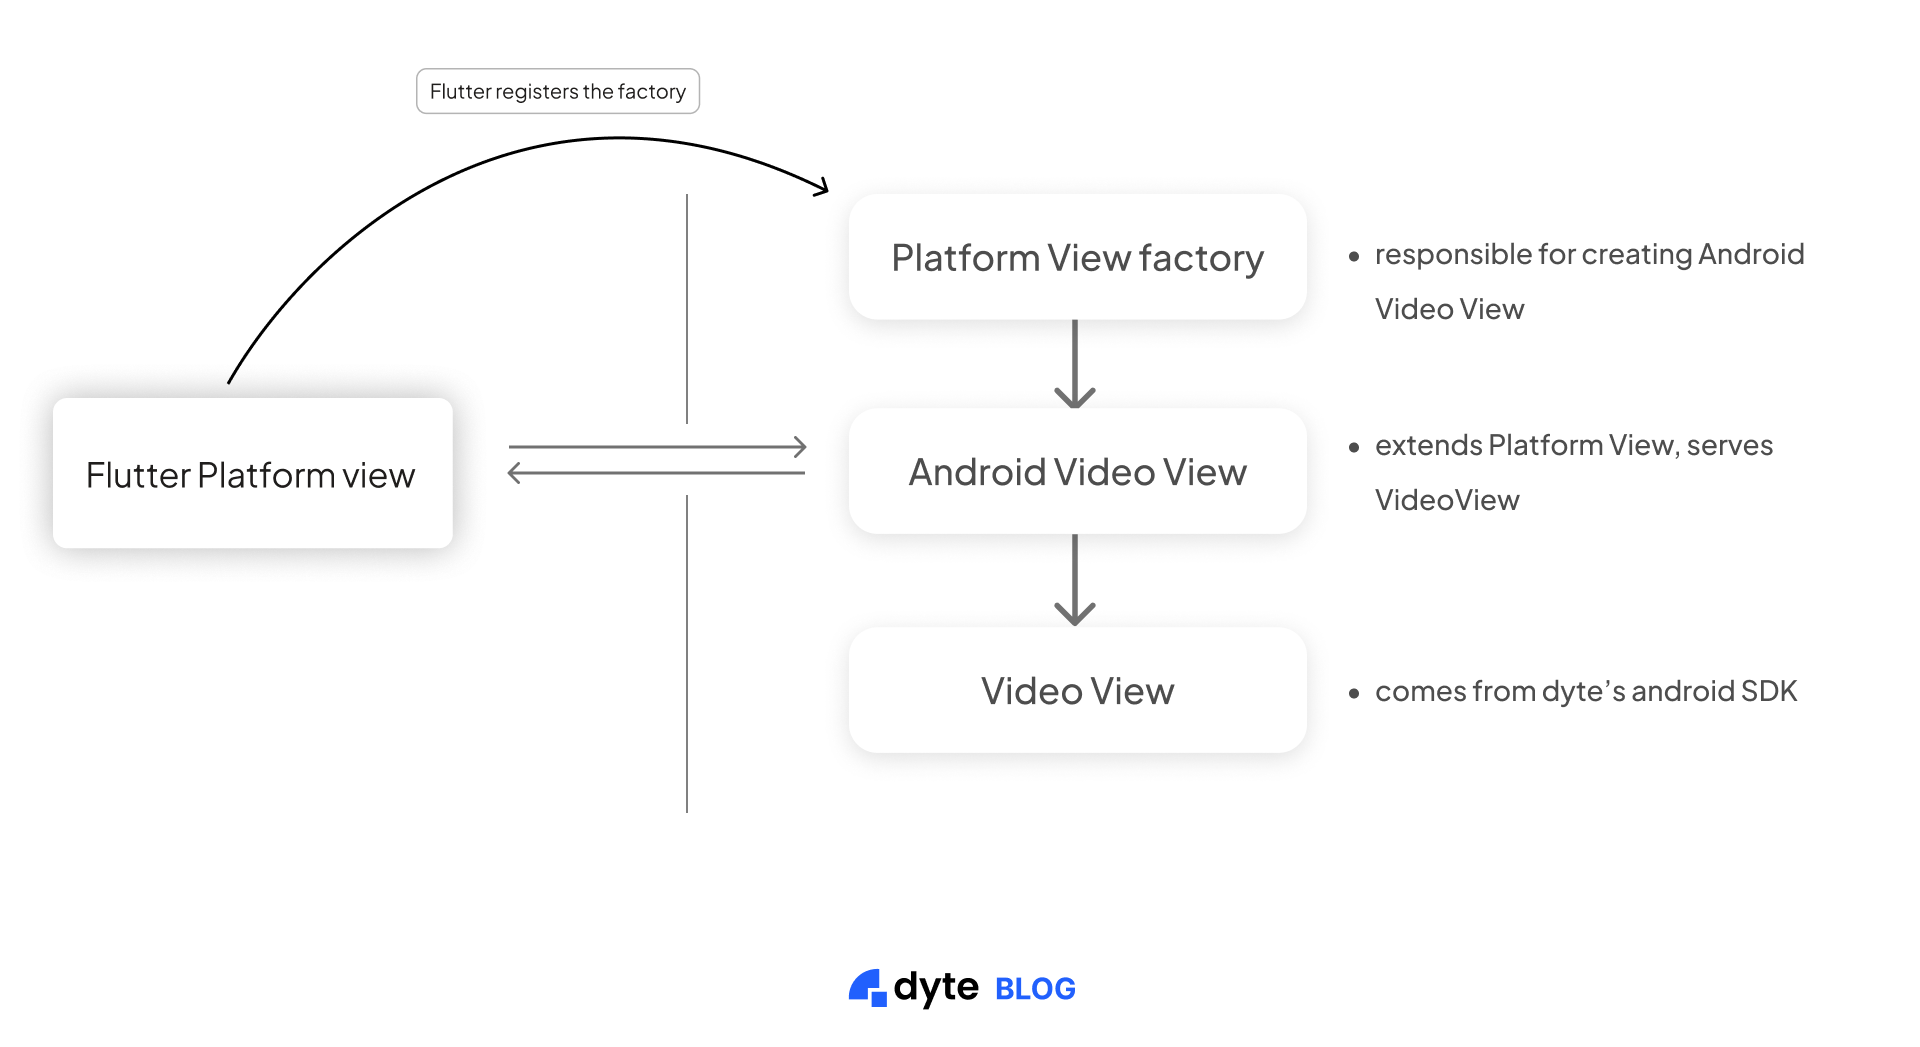
We have two Flutter SDKs: dyte core and dyte uikit. Dyte core has no knowledge of where the VideoView (which is a PlatformView) is going to be used. It might be possible that the VideoView for a single participant is used on multiple screens. Let’s call this VideoView as FlutterVideoView since VideoView is also present in our Android SDK and is a crucial part of this discussion.
We wrote a PlatformView, which serves VideoView. Let’s call it AndroidVideoView. Dyte core is dependent on our core mobile SDKs and VideoView is a View in Android.
We know that oneViewcan be part of only oneViewGroupat any moment of time.
Let’s keep this in the back of the mind that Flutter has no direct support to detect the visibility of a widget.
The problem we were facing was when we used FlutterVideoView for the same participant on two different screens. For the sake of simplicity, let’s call it screen A and screen B. Now when the user navigates from screen A to screen B everything was working smoothly as screen B was creating a fresh FlutterVideoView, which internally created a new instance of AndroidVideoView, so the VideoView is now attached to a new ViewGroup.
The problem was when the user navigated back from screen B to screen A, there was no way to detect if FlutterVideoView widget had gone from background to foreground so we could call render() on the AndroidVideoView, which is a PlatformView in our Flutter SDK. render() method calls the render() of VideoView, which internally takes care of removing the view from the old ViewGroup and renders the video track.
On the Dyte UI kit, we can get the lifecycle methods if the screen has been changed, but that would not solve the actual problem of the view not getting refreshed on its own. To solve this, we used a community plugin, visibility_detector in Dyte core flutter SDK. It gave us a widget that had callbacks that get triggered when its child widget’s visibility is changed.
Now the second part of the problem was to find out the PlatformView, which was associated with the widget and call render() on it. To tackle this we had to retrieve the View from the Flutter engine since all the PlatformViews are created by the Flutter engine itself.
To tackle this, we cached the FlutterEngine using FlutterEngineCache. This allowed us to access the PlatformView by its viewId.
FlutterEngineCache.getInstance().put("DyteFlutterEngine", flutterPluginBinding.flutterEngine)
Through the engine, we can access the PlatformView with the help of viewId, which is assigned to every PlatformView when it is created.
onCreatePlatformView: (params) {
        return PlatformViewsService.initSurfaceAndroidView(
         id: params.id,
         viewType: viewType,
         layoutDirection: TextDirection.ltr,
         creationParams: creationParams,
         reationParamsCodec: const StandardMessageCodec(),
         onFocus: () {
		     params.onFocusChanged(true);
          },
        )
				// Here we assign the view id.
          ..addOnPlatformViewCreatedListener(setNativeViewId)
          ..create();
      },
To access the native view, we did
val targetView = FlutterEngineCache.getInstance()["DyteFlutterEngine"]!!
	            .platformViewsController.getPlatformViewById(viewId) as AndroidVideoView?
Finally, we call the render() method on this view.
targetView?.render()
After all these steps, we clear the cached FlutterEngine to free up the memory. This helped us solve a critical issue in our Flutter video SDK.
Conclusion
This concludes our take on Flutter PlatformViews and how we use it at Dyte. Video is the most essential part of our Flutter SDK, and the Flutter ecosystem has provided us with great utilities to deal with it.
On top of it, we have made it seamless for you to have feature-rich audio video conferencing in your app with the least hassle. Stay tuned for more engineering blogs, we talk about behind the scenes, WebRTC, and cool things that can be built upon Dyte. Check out our blog here.
If you have any thoughts or feedback feel free to connect with me on LinkedIn or X(Twitter).