In our modern-day virtual era, video interactions have emerged as an essential factor in our regular workouts. Be it corporate conferences, virtual mentoring, or private chats, the want for reliable and smooth video exchanges is paramount. This is where the Dyte Video SDK presents a sturdy framework to infuse real-time video functionalities into your iOS apps. In this article, we will guide you on seamlessly integrating the Dyte Video SDK into iOS, empowering you to craft complete video-centric apps.
What exactly is Dyte Video SDK?
Dyte's Video SDK has emerged as a frontrunner inside the digital realm, providing a unified answer for immersive live reports. This powerful SDK seamlessly integrates audio/video conferencing, live streaming, and chat into products, doing away with the want for more than one piece of equipment. Trusted by way of numerous teams, it offers a cost-powerful alternative to traditional development.
Ease of use is a hallmark of Dyte. Builders can results easily transition from one-to-one interactions to scalable platforms with the usage of this singular SDK. Its wealthy function set consists of interactive factors like chat, polls, and screen sharing, ensuring a regular consumer revel in throughout devices.
Integration with present tasks is smooth, and the SDK offers exceptional customization. Dyte's commitment to help is evident with its 24/7 help, and its emphasis on security is underscored by its SOC-2 and HIPAA compliance. Testimonials from industry leaders further attest to its reliability and efficiency. For developers, Dyte gives a wealth of sources, from tutorials to open-source initiatives, facilitating a clean improvement adventure.
In a digital landscape that needs strong live interactions, Dyte's Video SDK stands proud as a comprehensive and reliable solution.
Why Dyte Would Be An Ideal Choice for iOS Integration:
- Optimized for the Latest iOS Features: Dyte is built with the latest iOS features in mind, providing seamless integration and taking full advantage of new capabilities as soon as they're released by Apple, ensuring that your app remains cutting-edge.
- Enhanced Performance: Dyte is engineered to deliver optimal performance on iOS devices, leveraging Swift's efficiency and speed, which can be crucial for compute-intensive applications.
- Robust Ecosystem Compatibility: With a strong focus on ecosystem compatibility, Dyte works harmoniously with Swift packages and other dependencies, ensuring a smooth development process across all Apple platforms.
- Ease of Use: Designed with developer experience in mind, Dyte offers a streamlined API that allows developers to integrate iOS features, reducing the learning curve and accelerating development.
- Strong Community and Support: Dyte boasts a supportive community and dedicated support resources, ensuring that help is available when needed, which is particularly beneficial for teams new to iOS development.
- Customization and Flexibility: Dyte offers high levels of customization and flexibility, enabling developers to tailor the integration to their specific app needs, which is essential for creating distinctive and powerful iOS applications.
- Security-Centric Design: Understanding the importance of security in the iOS ecosystem, Dyte incorporates robust security features that align with Apple's stringent requirements, protecting user data and ensuring app integrity.
- Cross-Platform Support: For teams working across multiple platforms, Dyte provides cross-platform support that facilitates code sharing and reduces redundancy while still optimizing for the unique characteristics of iOS.
By embracing technology like Dyte for iOS integration, developers can leverage these advantages to create apps that are not only powerful and feature-rich but also maintain the high standards expected from the iOS user base
Prerequisites
Before we dive into the integration process, make sure you have the following prerequisites in place:
- iOS Environment: Ensure that your Mac computers are running macOS version 12.0 Monterey or higher. Also, ensure that Rosetta is installed with Xcode on Mac computers with Apple silicon.
- Dyte Account: Sign up for a Dyte account on the Dyte website if you haven't already. You'll need a mechanism to retrieve the
authTokenfrom your server side, which you would have obtained as part of the Add Participant call. - Xcode: Install Xcode and set your platform to iOS 13.0 or above.
Steps to Integrate Dyte Video SDK with iOS
Before Getting Started
Make sure you've read the Getting Started with Dyte topic and completed the steps in the Integrate Dyte section. You must complete the following steps:
- Create a Dyte Developer Account
- Create a Dyte Meeting
- Add Participants to the meeting. This API returns the authentication token that is required to initialize your frontend SDKs.
Step 1: Install the SDK
CocoaPods
- Add the following line to your
Podfile.
pod 'DyteUiKit' , '0.6.0'- Install the client SDK as a CocoaPods dependency.
pod installSwift Package Manager
Add DyteUiKit SDK through Swift Package Manager in Xcode. Use https://github.com/dyte-in/ios-uikit-framework.git as the package source.
Add the necessary fonts and permission entries in the info.plist file. You can customize the strings shown in the permission pop-ups to match your audience preferences.
<key>NSBluetoothPeripheralUsageDescription</key>
<string>We will use your Bluetooth to access your Bluetooth headphones.</string>
<key>NSBluetoothAlwaysUsageDescription</key>
<string>We will use your Bluetooth to access your Bluetooth headphones.</string>
<key>NSCameraUsageDescription</key>
<string>For people to see you during meetings, we need access to your camera.</string>
<key>NSMicrophoneUsageDescription</key>
<string>For people to hear you during meetings, we need access to your microphone.</string>
<key>NSPhotoLibraryUsageDescription</key>
<string>For people to share, we need access to your photos.</string>
<key>UIBackgroundModes</key>
    <array>
        <string>audio</string>
        <string>voip</string>
        <string>fetch</string>
        <string>remote-notification</string>
    </array>
The UIBackgroundModes key in the Info.plist file declares the types of background tasks an iOS app can perform, allowing it to run and complete specific tasks in the background. Use of background modes must be justified and adhere to Apple's App Store Review Guidelines to avoid app rejection for misuse or unnecessary background running.
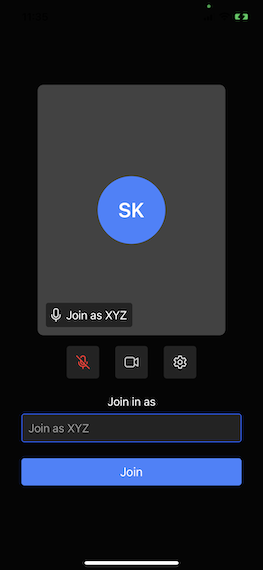
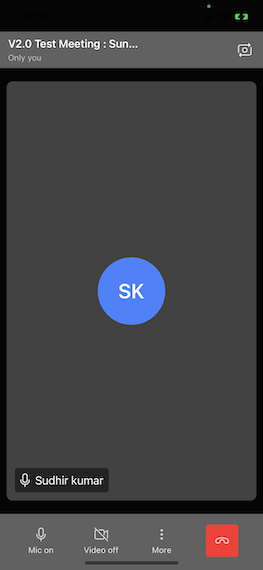
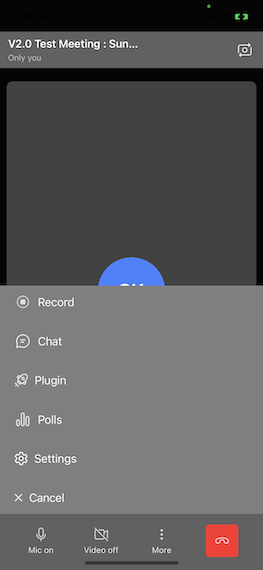
Step 2: Configure a Dyte meeting and Launch UI
To set the initialization properties in the DyteUiKit class, simply initialize DyteMeetingInfoV2 and provide the participant's authToken. You can get the authToken via the Add Participant API.
Try this in viewDidAppear()
import DyteUiKit
import DyteiOSCore

class ViewController: UIViewController {

    override func viewDidLoad() {
        super.viewDidLoad()
    }
    var dyteUikit: DyteUiKit!

   override func viewDidAppear(_ animated: Bool) {
        super.viewDidAppear(animated)
        dyteUikit = DyteUiKit(meetingInfoV2: DyteMeetingInfoV2(authToken: authToken, enableAudio: true, enableVideo: true, baseUrl: Constants.BASE_URL))
        let controller = dyteUikit.startMeeting {
            [weak self] in
            guard let self = self else {return}
            self.dismiss(animated: true)
        }
        controller.modalPresentationStyle = .fullScreen
        self.present(controller, animated: true)
    }
}
Here's a visual representation of all the configuration options described.
Conclusion
Integrating Dyte Video SDK with iOS enables you to build powerful and interactive video communication applications. by means of following the steps mentioned in this guide, you can get started quickly and take advantage of Dyte's strong video capabilities to create feature-rich applications tailor-made to your wishes. Be sure to discover Dyte's documentation for extra superior functions and customization options to beautify your video conferencing software similarly. Happy coding!


