At Dyte, we provide white-labeled audio/video SDKs to facilitate meetings, webinars, and live streams for our clients to integrate into their mobile and web apps to be used globally.
When participants join a meeting, Dyte allocates a media server to the meeting in the region nearest to these participants to ensure low latency and a smoother meeting experience. To figure out the closest region to use, we need to determine the location of these participants. The location need not be point precise; even if we have a rough idea of state/county/province/district, we can make a good enough decision.
To figure out the location, aka latitude and longitude, we were earlier receiving the IP of the caller from the network request from the client and passing this IP to third-party providers that keep track of IPs against latitude and longitude. Since these IPs keep changing, we went ahead with one such third-party location service provider to focus on our core offering of audio/video SDK rather than maintaining one more side project.
Pros of using third-party service:
- In-depth details of IP: These location services gave not just the position but also the city, country, company name, autonomous system number (ASN), and many more.
- Near Zero maintenance solution: We wouldn't have to maintain the database, scale, and frequent DB updates. API was uncomplicated and simple to upgrade if needed.
Cons of using third-party services:
- Latency: Most of the time, this extra information causes the latency to reach beyond 500ms.
- Third-party downtimes: Since fetching location was crucial, any downtime in the location service would mean downtime at Dyte, which was unacceptable.
- Cost: We didn't need most of the data, but we were still getting it, resulting in extra cost.
- Poor performance for some edge locations: Some edge locations were more prone to slow responses than others.
So, after months of facing these issues, we decided to take matters into our own hands and make our location service — that would have extremely low latency and lower costs with zero downtimes.
We had two approaches to create a new location service:
- Purchase or download free IP details, store them in DB and expose an endpoint to query.
- Think outside the box.
Since purchasing IP details and storing and maintaining them was going to be a lot of pain, we returned to our drawing board to see what else could be done if we were to think outside the box.
Introducing Cloudfront headers
After looking for alternate solutions everywhere, we came across CloudFront's request headers.
Since CloudFront already has the database and uses it to populate request headers, we wondered why not somehow use these headers to retrieve city, country, and location, among other things. Whatever we needed was there virtually free of cost, and latency was under 50ms compared to 500ms - 1 second.
The next step was to make the code return these headers work with edge locations without hitting any origin server. Since CloudFront, by its nature, supports edge locations and CloudFront functions, this step was already solved. All we needed was a small piece of code in CloudFront functions.
Steps to create location service CloudFront distribution
Here are the detailed steps to create a location service distribution yourself.
Create a Fake origin
We need to create a Fake AWS S3 bucket as an origin to keep CloudFront happy. Since CloudFront must have an origin, we had to give it one. This AWS S3 bucket will never be hit, so don't worry about S3 hits and the associated costs. You can go to AWS S3 and create a new S3 bucket manually.
Create a CloudFront function
Create a CloudFront function, put this simple code, and publish it.
function handler(event) {
    var headers = event && event.request && event.request.headers || {};
    function getHeaderValue(headerName){
        return headers && headers[headerName] && headers[headerName].value;
    }
    var response = {
        statusCode: 200,
        statusDescription: 'OK',
        headers: {
            'cloudfront-functions': { value: 'generated-by-CloudFront-Functions' },
            'access-control-allow-origin': { value: '*'},
            'access-control-allow-headers': { value: '*' },
            'access-control-allow-methods': { value: 'GET,OPTIONS'},
            'timing-allow-origin': { value: '*'}
        },
        body: JSON.stringify({
              city: getHeaderValue('cloudfront-viewer-city'),
              country: getHeaderValue('cloudfront-viewer-country'),
              region: getHeaderValue('cloudfront-viewer-country-region-name'),
              loc: (getHeaderValue('cloudfront-viewer-latitude') || '') + "," + (getHeaderValue('cloudfront-viewer-longitude') || ''),
              timezone: getHeaderValue('cloudfront-viewer-time-zone'),
              ip: (getHeaderValue('cloudfront-viewer-address') || '').split(":").slice(0, -1).join(":"),
              postal: getHeaderValue('cloudfront-viewer-postal-code'),
        })
    };
    return response;
}
Create a Distribution
While creating a CloudFront distribution, link the S3 bucket to it as the origin. Select the path pattern of your liking or leave it as default (*), and select desired HTTP methods. In Caching policies, set the following,
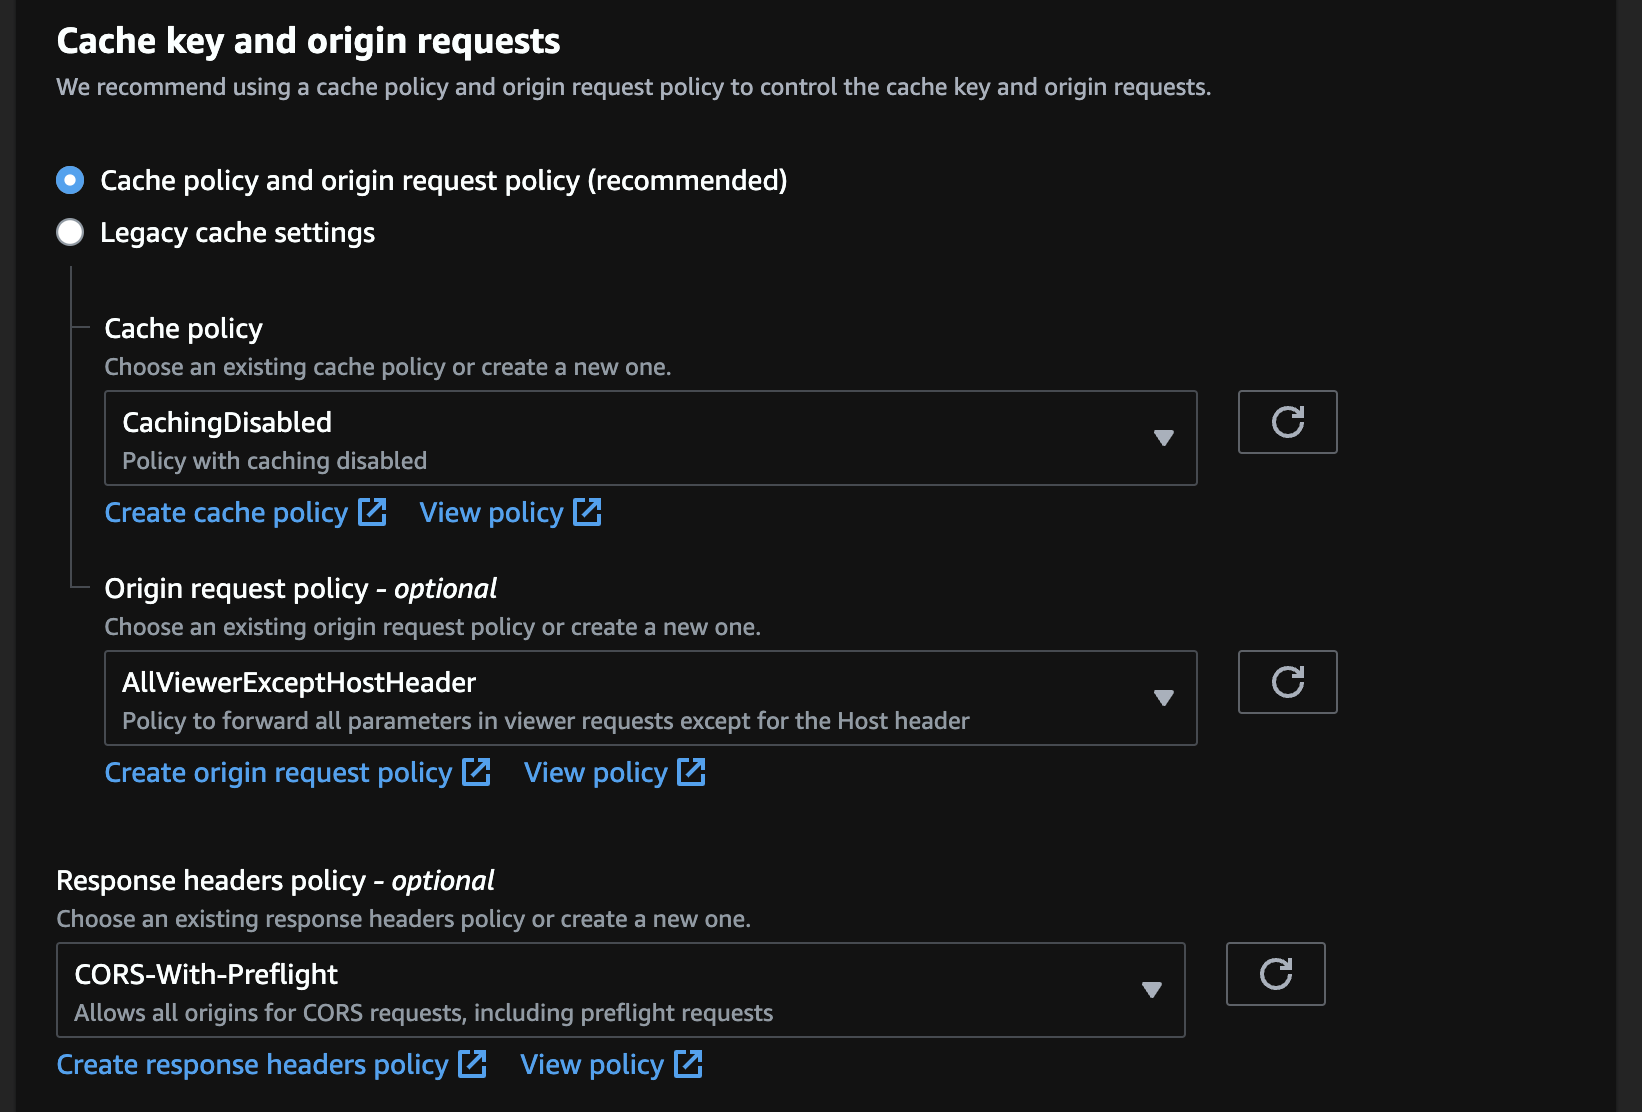
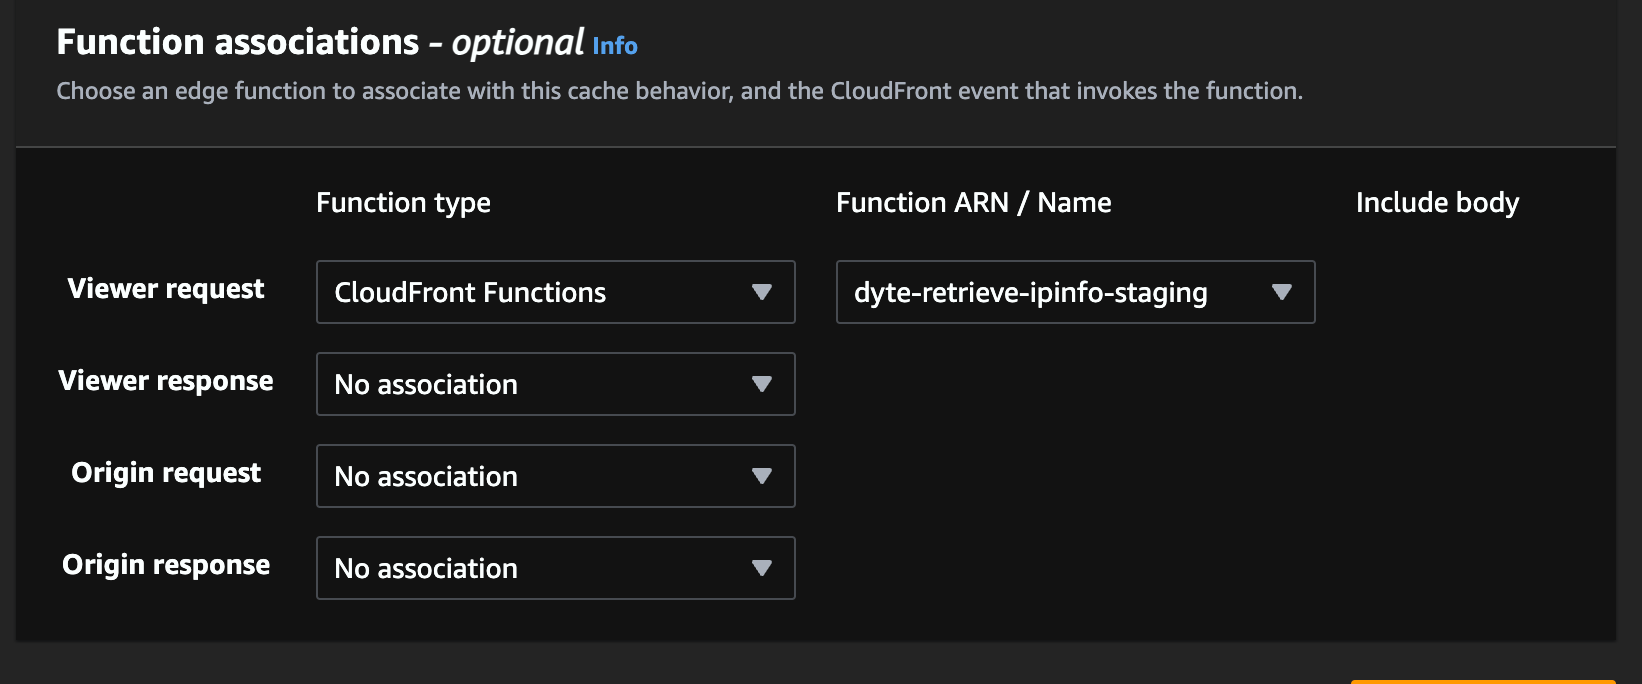
Map the previously created CloudFront functions as Viewer Request in function associations.
Once you are done making this distribution, test it out. You would get a URL similar to somerandomcharacters.cloudfront.net. Opening this link will show your IP details as follows.
{
  "city": "Gunzenhausen",
  "country": "DE",
  "region": "Bavaria",
  "loc": "49.11560, 10.75110",
  "timezone": "Europe/Berlin",
  "ip": "2a01:4f8:c0c:c129::1",
  "postal": "91710"
}

If you have come so far, the next step is to link Route 53 to this CloudFront distribution to have a sane-looking domain name such as ipdetails.yourwebsite.com. If you are not using Route 53, use the tool of your choice. It is not a must.
User Flow
Overall, the user flow will look like the following.
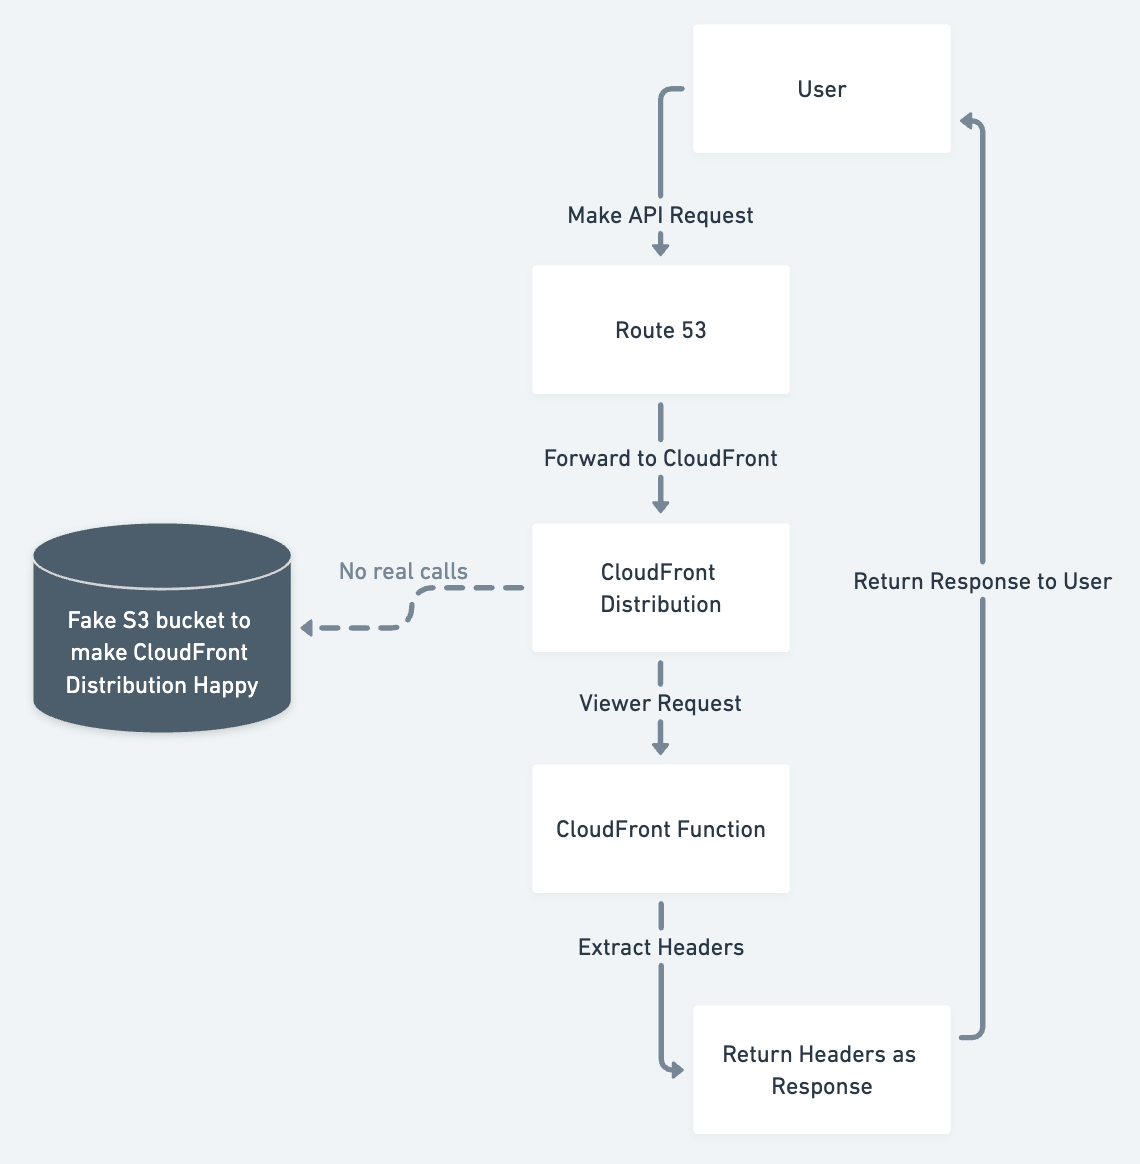
Voila, you now have the IP info solution that gives results under 10ms. Below is an instance of it delivering IP details in 6ms!

There is no need to maintain and scale DBs or purchase anything. You now have a simple near-zero maintenance location service distribution system that is extremely fast. It is not going to go down easily; AWS can attest to that.
Though these are minimal improvements in terms of cost for many organizations to even take up, they are huge in reducing latency. Collectively, they make Dyte's customer experience better with time.
I hope you found this post informative and engaging. If you have any thoughts or feedback, please contact me on Twitter or LinkedIn. Stay tuned for more related blog posts in the future!
If you haven't heard about Dyte yet, head over to dyte.io to learn how we are revolutionizing communication through our SDKs and libraries and how you can get started quickly on your 10,000 free minutes, which renew every month. You can reach us at support@dyte.io or ask our developer community.