Introduction to package.json scripts
Welcome to the world of Javascript development, where building, testing, and deploying applications can be complex and time-consuming. As developers, we strive to automate these tasks as much as possible, and that's where npm scripts come in. npm scripts are powerful and flexible tools that allow us to define custom commands and automate repetitive tasks with ease. They can help us save time, reduce errors, and improve collaboration within our teams.
In this blog post, we'll explore the basics of npm scripts and how they can simplify your Node.js development workflow. We'll cover the syntax and structure of npm scripts, how to run them, and some common use cases. Whether you're a seasoned Node.js developer or just getting started, this guide will help you unlock the full potential of npm scripts and streamline your development process.
This article is a continuation of another article I recently published - Discovering package.json, make sure to check it out as well!
Why use npm scripts?
npm scripts are used in every Node.js project. Certain workflows and commands are defined in the scripts section of the package.json file. npm (and other package managers) provide commands that can run these scripts without any additional dependencies or build requirements.
- Simplify build and development workflows: npm scripts allow developers to define custom commands for tasks like building, testing, and deploying applications. This makes it easy to automate repetitive tasks and simplify complex workflows, improving overall efficiency and productivity.
- No need for additional build tools or dependencies: npm scripts are built into Node.js, so there's no need for additional build tools or dependencies. This reduces the complexity of the development environment and makes it easier to share code across different platforms.
- Easy to use and customize: npm scripts are easy to use and can be customized to suit the specific needs of each project. They provide a simple and flexible way to define custom commands and automate tasks without requiring extensive knowledge of build tools or complicated configuration files.
- Document and share workflows: npm scripts can be used to document and share development workflows within a team. This helps ensure that everyone is on the same page and that the development process is consistent and reproducible.
- Provide pre-and post-scripts: npm scripts can define pre- and post-scripts that run before or after a specific command. This allows developers to run any necessary setup or cleanup tasks before or after a command is executed, improving the overall reliability of the development process.
Basic npm scripts
In your package.json file, you can add a scripts field to define your scripts. Inside this object, you can enter key-value pairs for your npm scripts, where the key is the script's name and the value is the shell command. The commands are typically passed to sh, so you can run commands like ls too in your npm scripts.
The basic syntax for defining a script in the scripts field is:
"script-name": "command"
Here, script-name is the name you want to give your script, and command is the shell command you want to execute when the script is run. For example, to define a script that runs tests using the mocha testing framework, you could add the following to your scripts field:
"test": "mocha"
To run this script, you would execute the following command in your terminal:
npm run test
You can also define scripts that run multiple commands or use variables. For example, you could define a script that builds your application and then starts a development server like this:
"start": "npm run build && node server.js"
In this case, the start script runs two commands: npm run build (which could be defined to compile your source code) and node server.js (which starts the development server).
The start script is a special script, like test, etc. You can run npm start to run the start script instead of npm run start. Similarly, for running a script called test, you can just run npm test or even npm t instead of npm run test.
Tricks and tips in scripts
Let's say you have the following package.json. You might not be aware of some neat tips and tricks in using these scripts.
{
"name": "dyte",
"version": "1.0.0",
"description":" ",
"main": "index.js",
"scripts": {
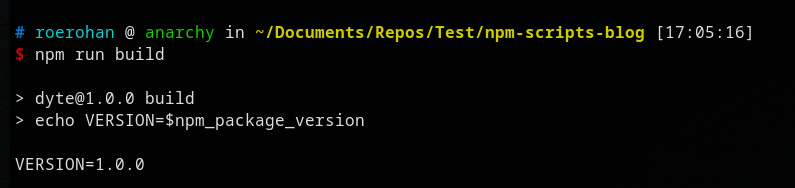
"build": "echo VERSION=$npm_package_version",
"test": "echo 'Running tests'",
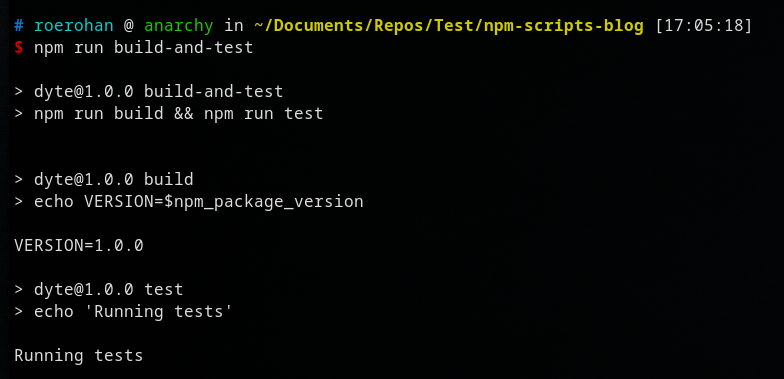
"build-and-test": "npm run build && npm run test",
"build-and-test-parallel": "npm run build & npm run test"
},
"author": "Rohan Mukherjee <rohan@dyte.io> (<https://dyte.io>)",
"license": "ISC"
}
Using features provided
When you run npm run build, you can see that the $npm_package_version variable is replaced with the version of the package specified in the package.json.
Similarly, you can use other variables like $npm_package_name in your script to extract values from the package.json file.
If you want to execute a script you're unsure about the existence of, you can use the -if-present flag so that the command doesn't exit with a non-zero status code.
npm run build --if-present
If you're using workspaces and want to run a script in a different workspace, you can specify the workspace name using --workspace or -w.
Let's say that you've already defined a lint script as follows:
"lint": "eslint ./src --ext .ts --ext .js"
Upon running the lint script, eslint will list all the linting issues from the src directory of your project. You want to define a script to fix all auto-fixable linting issues. You'd typically have to define a command like
"lint:fix": "eslint ./src --ext .ts --ext .js --fix"
Now, if you want to include the extension for .jsx files also in your lint script, you'd have to make the change in both places, and it's easy to miss changing one of these places.
Since the lint:fix command is very similar to the lint command, and only requires an additional flag, you can reference the lint command in the lint:fix command to reuse it. For instance, you can run
"lint:fix": "npm run lint -- --fix"
This will run the lint command and pass an additional argument --fix to it. Anything you add after -- will be passed as a string to the npm command specified before.
Using sh tricks in scripts
Since the scripts are run using sh (on all Unix-based systems), you can use some neat sh tricks to run multiple scripts together. On Windows systems, the scripts are run using the default shell - cmd (Command Prompt). However, you can change the shell used on Windows to something like git bash using the following command.
npm config set script-shell "C:\\\\Program Files\\\\git\\\\bin\\\\bash.exe"
You can also run 2 scripts using the && operator in a script. For instance, if you run the build-and-test script, it will execute the test npm command only after the build script completes successfully (exits with status code 0).
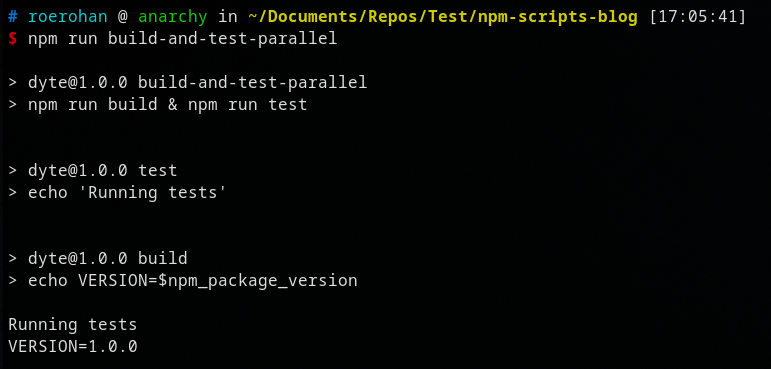
You can also run these scripts in parallel, using a since &. The build-and-test-parallel command runs the scripts together and is not guaranteed which process will complete first. In this example, the test script finished before the build script.
These operators are however not specific to npm scripts. You can run them in sh or bash directly as well. It's also possible to run a command upon the failure of another. For instance, if you want to run a command upon the failure of another, you can use the || operator.

In the above screenshot, one command exits with the code 1 (which indicates that the command failed), so the Goodbye script runs post that.
In fact, you can chain commands using && and || to decide what to execute upon success and what to execute upon failure.


Lifecycle Scripts
lifecycle scripts are a set of predefined script names that are executed automatically by npm at specific stages during the lifecycle of a package. These scripts are defined in the package.json file of a Node.js project and can be used to perform various tasks such as installing dependencies, running tests, building the project, and deploying the application.
The npm lifecycle consists of several stages that are executed in a specific order:
- "prepublish": This script runs before the package is packed and published, and is used to prepare the package for distribution.
- "prepare": This script runs both during local development and when the package is installed as a dependency of another package. It is used to prepare the package for use, such as by building or compiling the code.
- "preinstall": This script runs before the package is installed and is used to perform any necessary setup tasks before dependencies are installed.
- "postinstall": This script runs after the package is installed and is used to perform any necessary setup tasks after dependencies are installed.
- "preuninstall": This script runs before the package is uninstalled and is used to perform any necessary cleanup tasks before dependencies are removed.
- "postuninstall": This script runs after the package is uninstalled and is used to perform any necessary cleanup tasks after dependencies are removed.
- "preversion": This script runs before the version of the package is updated and is used to perform any necessary tasks before the version is changed.
- "postversion": This script runs after the version of the package is updated and is used to perform any necessary tasks after the version is changed.
To define a custom pre- or post-script, you need to add a property to the scripts object in your package.json file. The property name should be in the format of "pre" or "post" followed by the name of the script you want to run. For example, to define a preinstall script, you can add the following to your package.json file:
{
  "name": "my-package",
  "version": "1.0.0",
  "scripts": {
    "preinstall": "echo Running pre-install script"
  }
}
In this example, the pre-install script will run before the npm install command is executed. You can replace the echo command with any shell command or node script you want to run.
Similarly, you can define a post-install script by adding a property named "post-install" to the scripts object:
{
  "name": "my-package",
  "version": "1.0.0",
  "scripts": {
    "postinstall": "echo Running post-install script"
  }
}
This script will run after the npm install command is executed.
You can define pre- and post-scripts for other npm commands as well, such as "pretest", "posttest", "prepublish", "postpublish", etc. Just prefix the script name with "pre" or "post" accordingly.
Note that the pre and post-scripts are executed in the order they are defined in the package.json file, and you can define multiple pre and post-scripts for the same command.
Disclaimer: Use “postinstall” scripts carefully, as supply chain security software will fire up alerts upon detecting postinstall scripts. In npm packages, postinstall scripts can be used as a means to install malware into the installer's system, hence it's advisable not to use it in an npm package. However, it's okay to use it as long as you remove it from your package.json when publishing the package.Best Practices
Here are some best practices for writing npm scripts:
- Keep scripts simple and readable: It is important to keep your scripts simple and easy to read. Use meaningful script names and avoid writing long scripts with many commands. Break down complex tasks into smaller sub-tasks and write separate scripts for them.
- Use variables: Use environment variables to store commonly used values, such as directories or file paths, and use them in your scripts to avoid hardcoding.
- Use package.json to declare dependencies: Declare dependencies in your package.json file instead of installing them inside your scripts. This will ensure that your dependencies are installed before your script runs.
- Avoid platform-specific commands: Avoid using platform-specific commands in your scripts. Use cross-platform tools like Node.js or Bash to ensure that your scripts work on different platforms. For instance, if you want your
npmscript to remove a certain directory using therm -rfcommand, this would work perfectly on a Linux or Mac machine but would error out on Windows. To avoid this, you can use a cross-platform package such asrimraf. - Keep scripts independent: Keep your scripts independent of each other to avoid dependency issues. If you need to run one script after another, use a task runner like Gulp or Grunt to define tasks and their dependencies.
- Use exit codes: Use exit codes to indicate the success or failure of your scripts. Return a non-zero exit code to indicate that the script failed and zero to indicate that the script succeeded.
- Use pre- and post-scripts: Use pre- and post-scripts to execute common tasks before and after your scripts run. For example, use pre-scripts to ensure that your dependencies are up-to-date and post-scripts to clean up any temporary files.
Take a look at this package.json file in our docs repository to get a good idea about how npm scripts are used in repositories. You can also check out how lifecycle scripts can be used efficiently in this example: react-vnc.
Summary
In conclusion, npm scripts are a powerful tool for automating tasks and simplifying the development workflow in modern web development. With just a few lines of code, you can define scripts to run tests, build your project, start your development server, and much more.
To make the most of npm scripts, it is essential to follow some best practices such as keeping scripts simple and readable, using variables, avoiding platform-specific commands, documenting your scripts, and using pre- and post-scripts.
By using package.json npm scripts, you can streamline your development workflow and save time and effort. You can also make your code more reliable and maintainable by automating repetitive tasks and ensuring that your code is error-free.
Overall, npm scripts are a powerful and essential tool for any modern Node.js developer. With the right knowledge and best practices, you can harness the full potential of npm scripts to create more efficient, reliable, and scalable projects.
I hope you found this post informative and engaging. If you have any thoughts or feedback, feel free to reach out to me on Twitter or LinkedIn 😄. Stay tuned for more related blog posts in the future!