Ever wondered how the interactive elements are pushed during a live stream or how Netflix shows small images on top of the seek bar? How the data and content are perfectly synced together.
One of the ways to do it is by using the timestamp of the video player. The video stream and data are sent separately but synchronized seamlessly, almost like magic. This is called timed metadata. This synchronization approach is similar to how subtitles work, using a .srt file with timestamps and data. Most players can easily parse this file.
What if this data is inside the video stream? What if you could sync the metadata using the video stream's clock itself? Inserting the data inside the video stream itself is called the in-band approach of timed metadata, and using an external file is called the out-band approach.
Let's dive in and see some of the use cases of the in-band/out-band approaches.
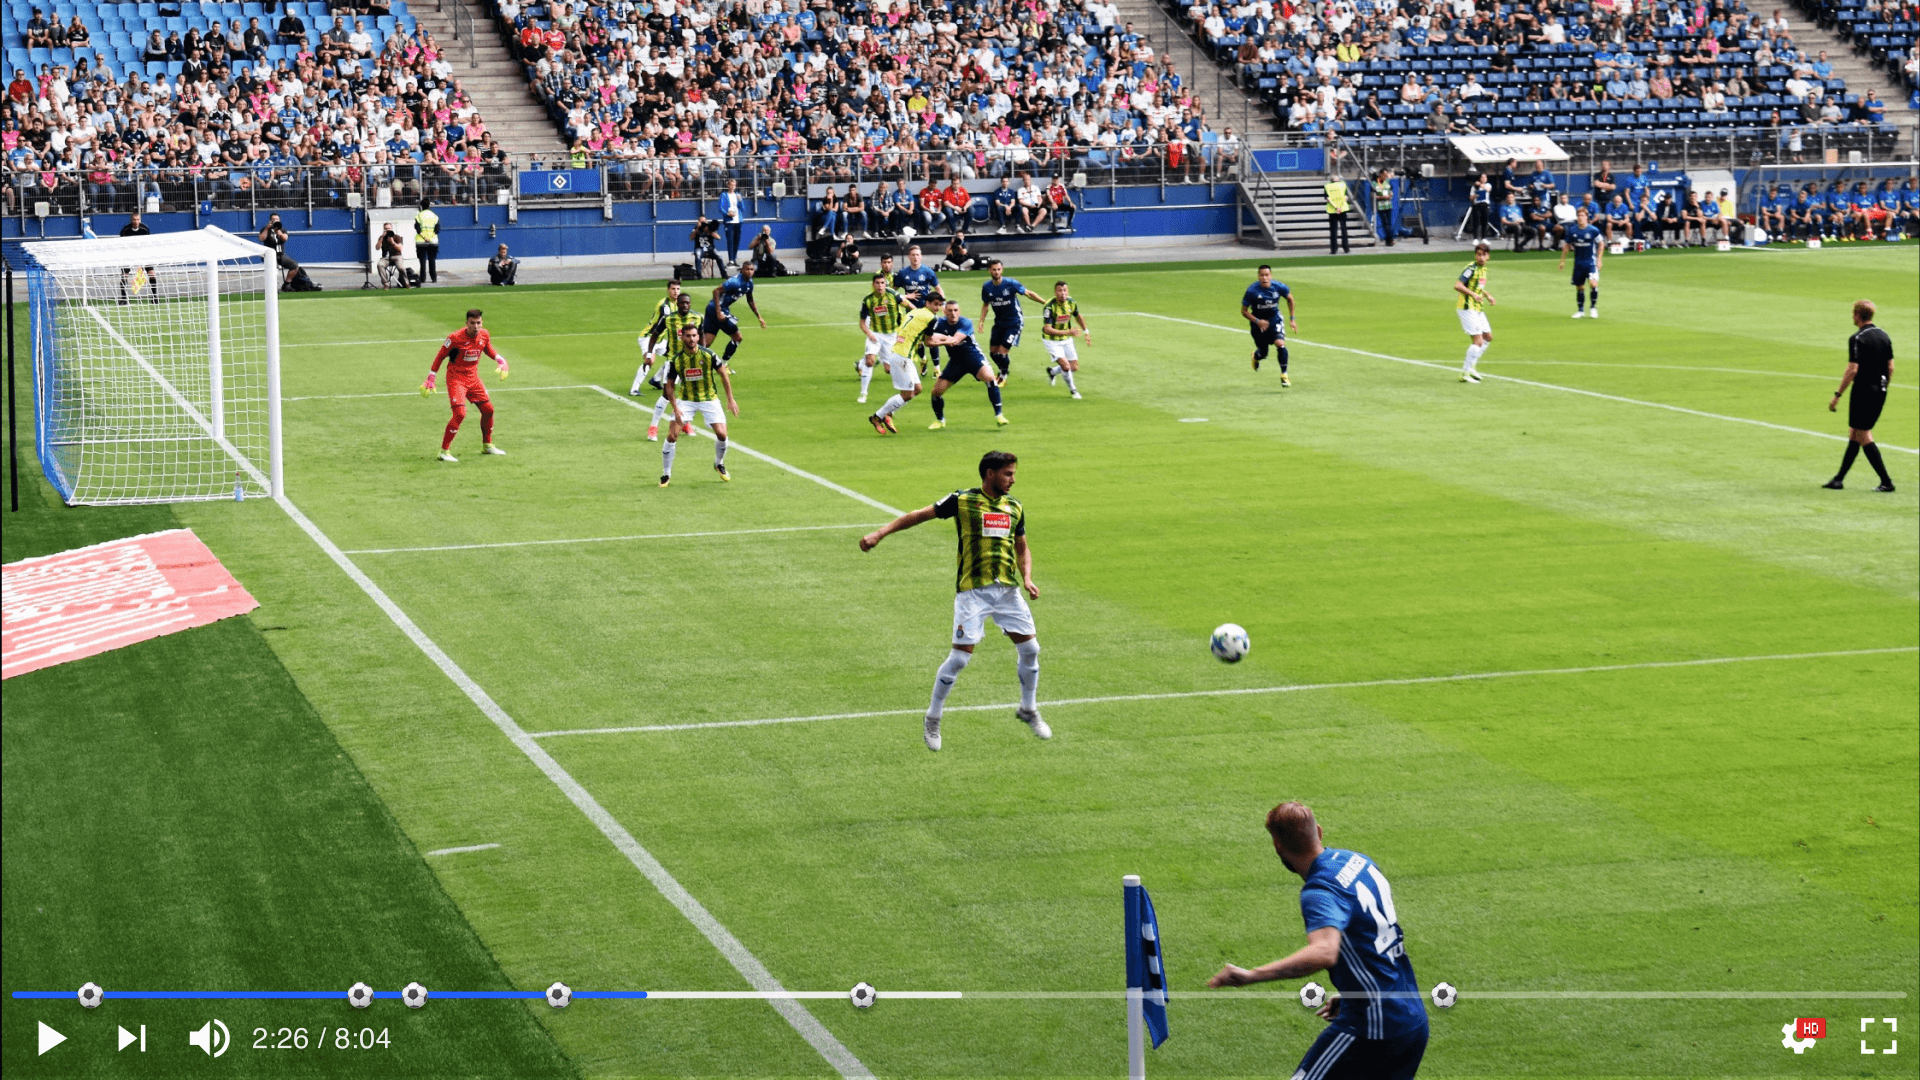
Markers
Associate data to highlight a marker in a stream. In the example below, we use a marker to denote a time when a goal was scored.
Advertisements
Timed metadata can show ads at specific instances without hurting the user's experience.

Actions and events
Display anything at a particular timestamp. Let's say you want to display some text at the 40-sec mark. You can read those cues and perform that actions.

How does it work?
There are multiple specifications for this, categorized into two types:
- In-band - Metadata is stored inside the media segment and extracted when the segment is played.
- Out-band - Metadata is stored externally in a separate file e.g., a playlist .m3u8 or a
.vttfile, and synced along with the playback
The one we will talk about today is the one HLS supports with ID3 timed metadata carried in-band within MPEG-2 Transport Streams [HLS-TIMED-METADATA]. Sigh! These were a lot of words. Let's break each of them down.
HLS→ HTTP Live Streaming. It is a streaming protocol that delivers audio and video to viewers online. Read more about HLS.
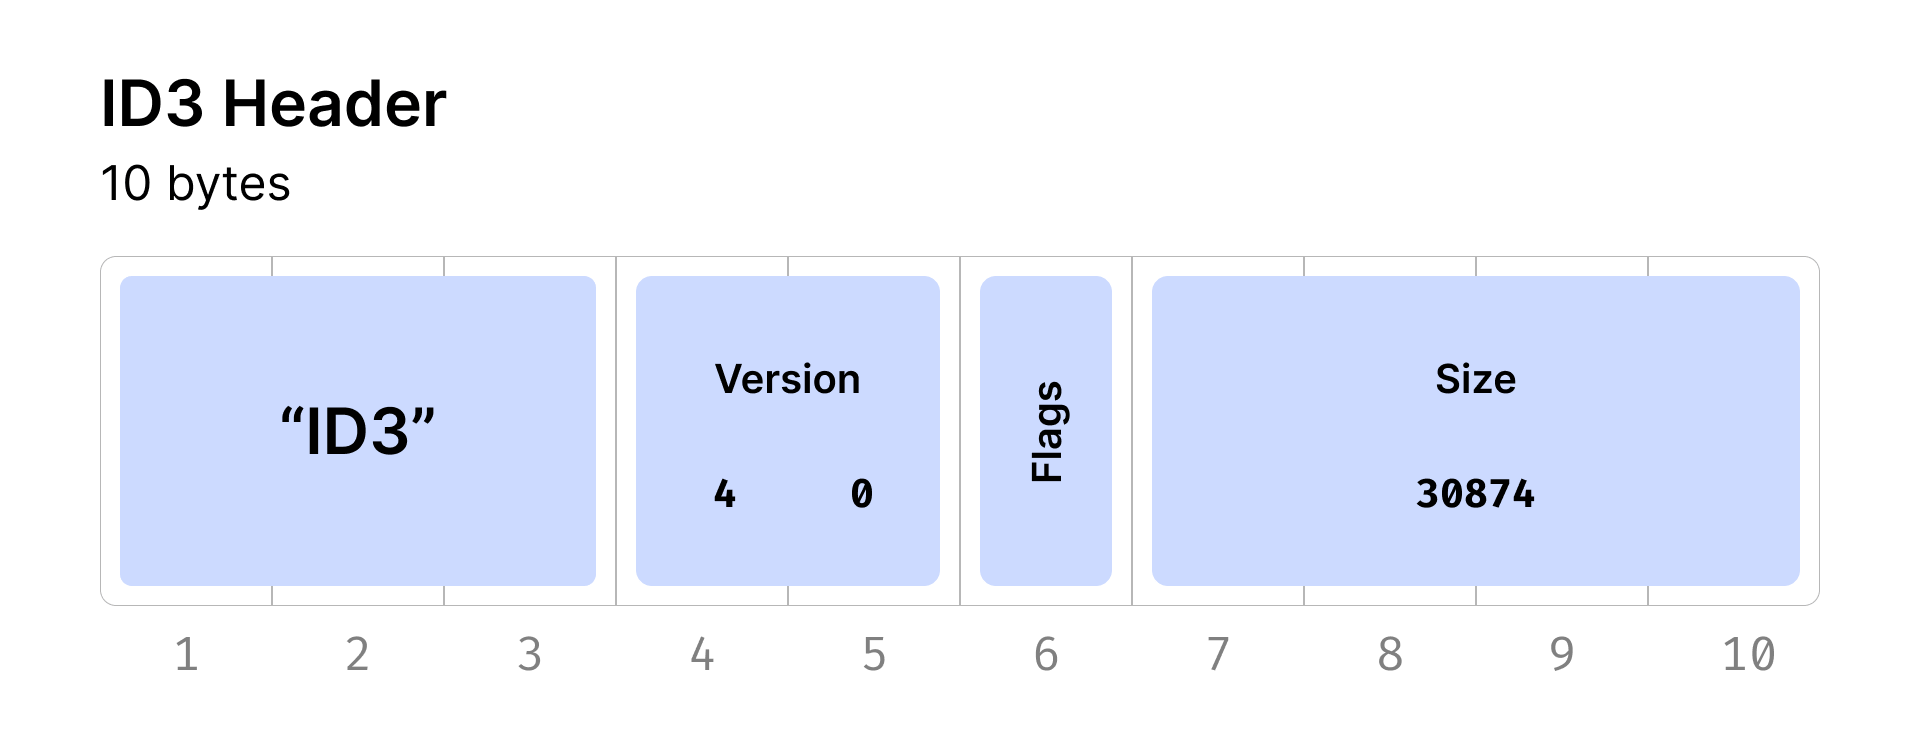
ID3 → This is the format in which data is stored. ID3 metadata is stored as a complete ID3v2.4 frame in an elementary stream (PES) packet, including a full ID3 header [ID3v2].
In-band → It means the metadata is stored inside the streams. (We will discuss how later on)
MPEG-2 Transport streams→ MPEG-2 is the file format. It contains what we call a transport stream to deliver the media.
We will talk about MPEG-2 TS in more detail later, but first, let’s see talk about ID3.
ID3 v2.4
Remember when you downloaded .mp3 files from the internet, sorry, from iTunes? It had an image poster, artist name, year, and other metadata. That data was stored as ID3 tags inside the audio files. Yeah, the standard is that old, I know! There are two major versions of ID3, v1 and v2. The main difference between them is that in v1, the data is stored at the end of the file, whereas in v2, it is stored at the start of the file. We are interested in v2, specifically ID3v2.4.
ID3 header structure -
You can find more info here https://id3.org. (Oh, this doesn't work, I know. Here is an "unofficial" one.)
Inserting into a stream.
Okay, we have the tag format. Let's insert it, but how? It's not like we can just concat the two files, tag and media, and call it a day. It isn't that simple. I wish it were.
You can find the specification for inserting ID3 metadata inside HLS here.
Yes, it is old, but that's all I could find officially. I am not smart enough to understand this and can't even read this properly - PES, PMT. That's like someone speaking Klingon in front of me. I need to see examples of it, and then I may be able to read it.
Thanks to Apple, we have CLI tools to do this. Have you seen them being this generous https://developer.apple.com/documentation/http-live-streaming/using-apple-s-http-live-streaming-hls-tools?
Did I speak too soon? Yes, the CLI can only be run on macOS. That's more like Apple.
Demo time
For this tutorial, you will need to download 2 tools from the above website ID3 tag generator and media file segmenter
First, let's create an ID3 tag.
id3taggenerator -t "Hello world!" -o data.id3
Flags
-t This specifies that it is text data. You can have other data such as pictures, URLs, binary, etc. -o is for specifying the output file.
For the curious minds, we can actually hexdump the data.id3 file and take a look at the header.
Inserting the data
Before running the mediafilesegmentor you need to generate a meta file. It is a macro file containing the metadata entries to inject into the stream. It looks something like
seconds type path
Here seconds is the timestamp, type is ID3 (in our case), and path is the absolute path to the specified ID3 tag file.
Now that you have this, you can run the following command
mediafilesegmenter -M id3.meta -f testfile testfile.mp4
It is stored in the folder testfile. You will have multiple segments of the file and a playlist file. If you run ffmpeg -i on the file.
Voila, you have inserted the data into a video file, but how to play it?
You can use this hls.js code snippet to play around with it.
const onFragChanged = (_) => {
  // We first try to find the right metadata track.
  // <https://developer.mozilla.org/en-US/docs/Web/API/TextTrack>
  const textTrackListCount = videoEl.textTracks.length;
  let metaTextTrack;
  for (let trackIndex = 0; trackIndex < textTrackListCount; trackIndex++) {
    const textTrack = videoEl.textTracks[trackIndex];
    if (textTrack.kind !== 'metadata') {
      continue;
    }
    textTrack.mode = 'showing';
    metaTextTrack = textTrack;
    break;
  }
  if (!metaTextTrack) {
    return;
  }
  // Add an oncuechange listener on that track.
  metaTextTrack.oncuechange = (event) => {
    let cue = metaTextTrack.activeCues[metaTextTrack.activeCues.length - 1];
    console.log(cue.value.data);
  };
};
// listen on Hls.Events.FRAG_CHANGED from hls.js
hls.on(Hls.Events.FRAG_CHANGED, onFragChanged);
Deep dive into MPEG-2 TS
You can find the spec for MPEG-2 file format here. Here's a quick summary of the terms that we are interested in
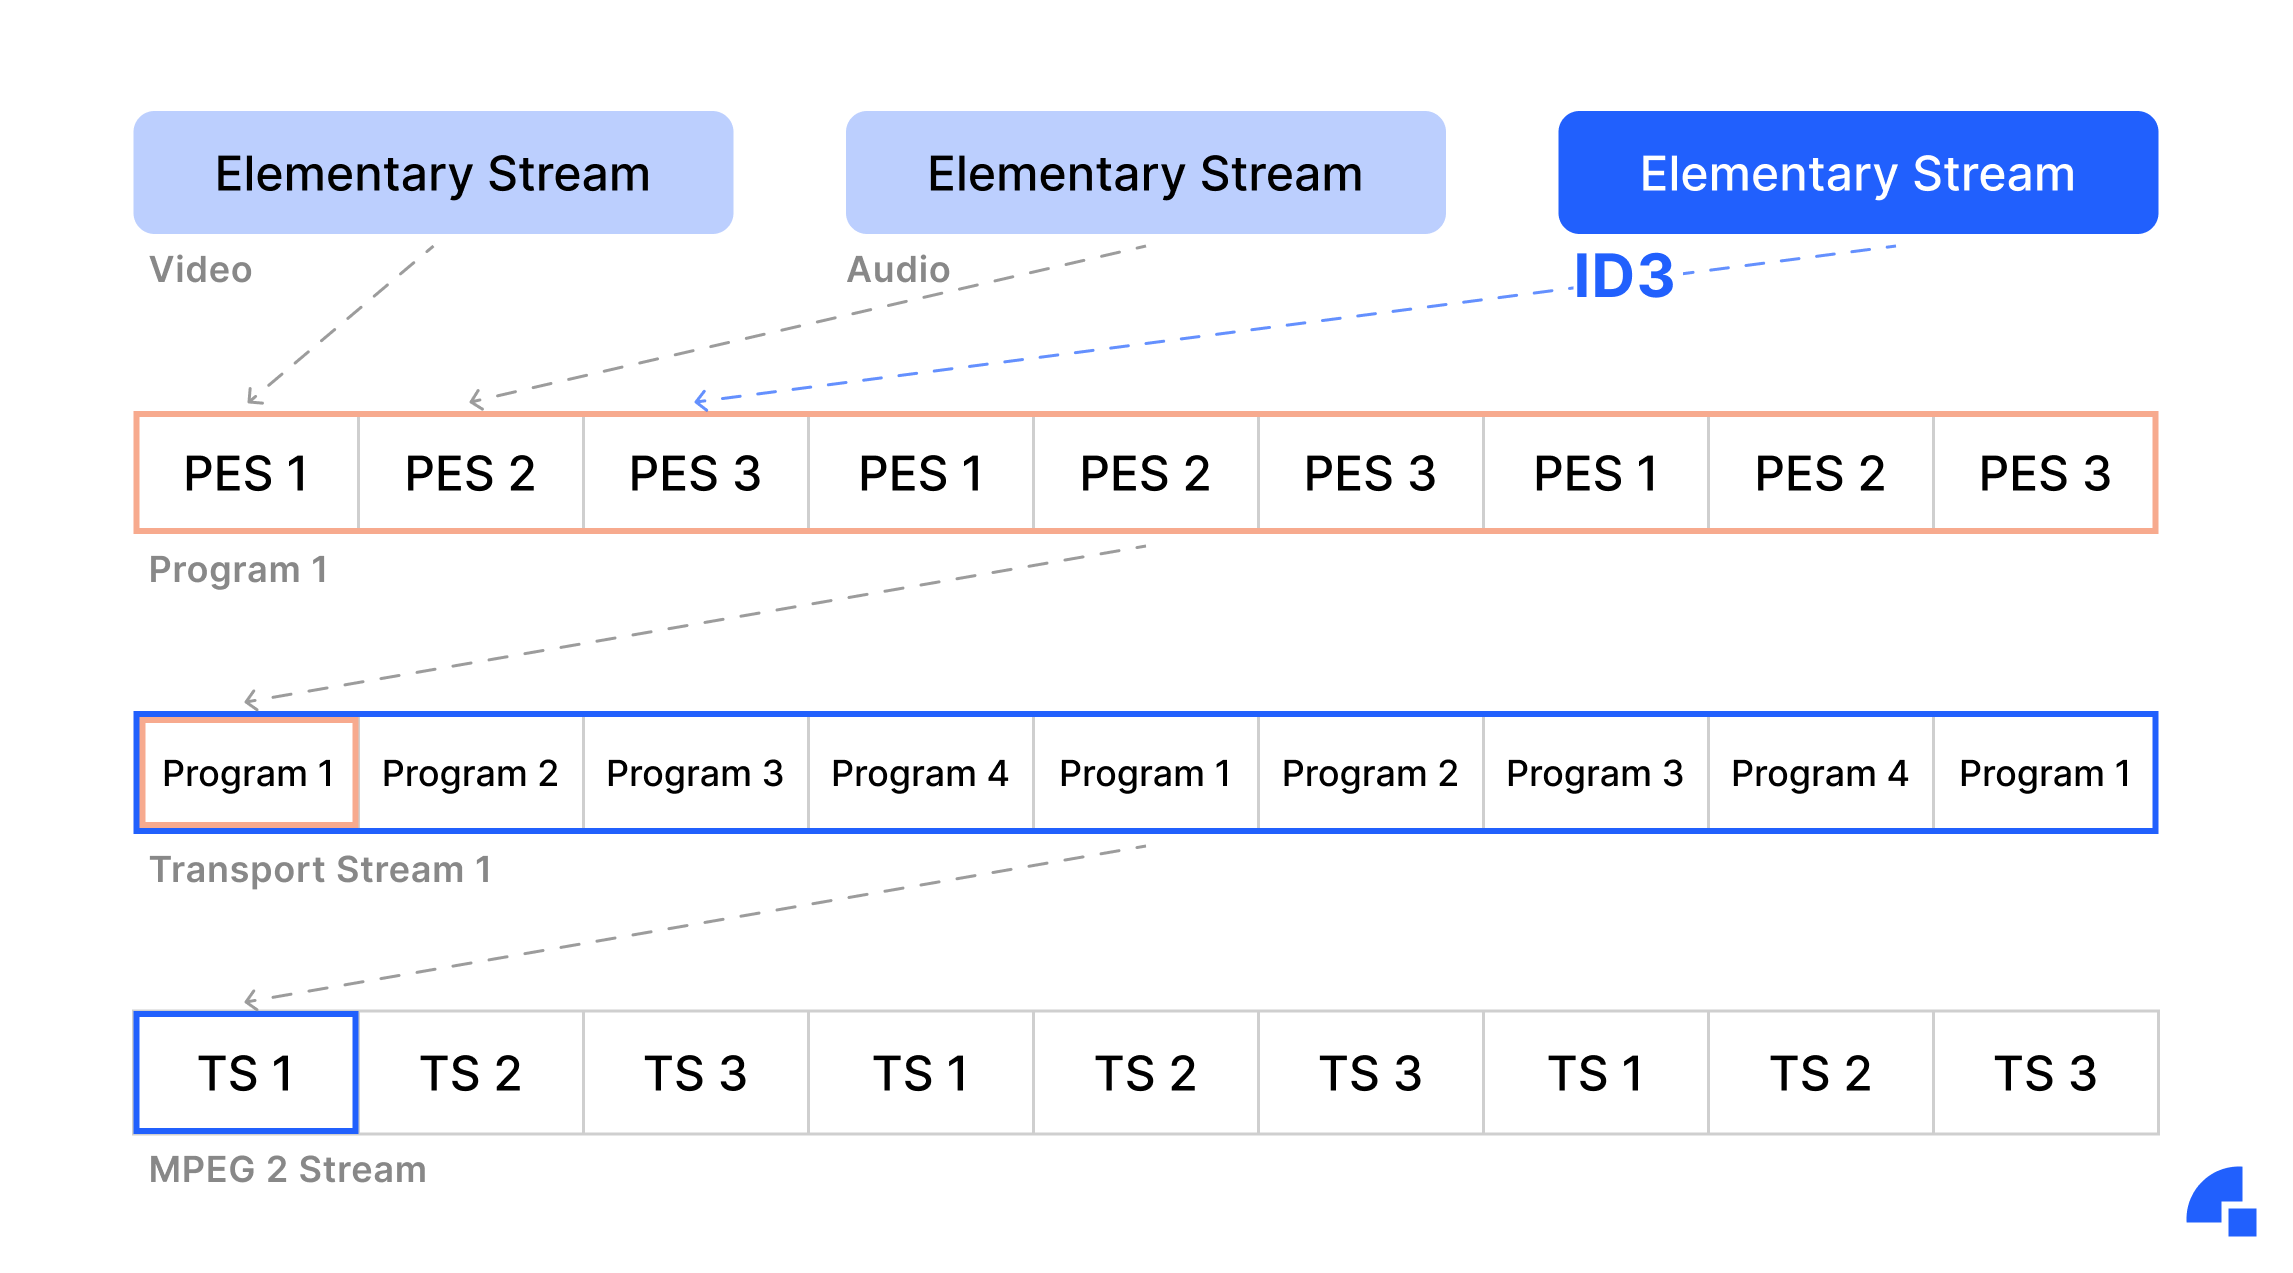
PES: Packetized elementary stream - This is the format in which mpeg-2 ts carries individual audio, video, and data streams in packets
PMT: Program map table - Every mpeg-2 ts is made of different programs, and each program has PMT. The user can decode only the specific program they want using the PMT. The table contains program ids attached to it as well as the streams inside that program.
PCR: Program clock reference - It's clear by the name it's a clock that helps the decoder to sync the streams. The clock rate of this is 90khz.
PTS: Presentation timestamp - It is intended to be relative to the PCR. Each PES packet has a PTS value in it for sync purposes.
PID: Packet Identifier Id - Each table or elementary stream in a transport stream is identified by a 13-bit packet identifier (PID
Now that you have fundamental info around the mpeg-2 ts terms read that Apple specification. It will be much more apparent.
Putting it together
- First, we create an additional stream of type
Data, we can specify that usingstream descriptors. - Then assign a unique PID (Packet Identifier) to this stream, ensuring that no other streams share the same PID.
- Next, we include this newly assigned PID in the program map table (PMT). This step is vital as it allows the decoder to identify and recognize all the available streams within the packet.
By following this approach, we can effectively insert our data as timed metadata into the TS stream. The PCR clock, ticking at a rate of 90,000 times per second, provides the necessary synchronization, enabling us to insert metadata tags at precise intervals.
This process grants us the ability to create a third Timed Metadata stream alongside the standard audio and video streams within the MPEG-2 TS, allowing for the seamless integration of metadata with the media content.
This is an output of FFmpeg which takes in a file with ID3 data inserted.

As you can see, there are three streams audio, video, and a third Data stream with timed_id3 data.
You can go here to read more about Media Timed Events from here. It has a lot of different specs and techniques for achieving similar results. It was an invaluable resource while researching.
We have also integrated this in Dyte, of course. Insert metadata at this 90KHZ clock precision in your dyte recordings using this guide
And that’s a wrap!
Conclusion
Timed metadata is a powerful thing that enhances the interactive elements and user experience during live streams and video playback. Whether it's highlighting markers, displaying ads seamlessly, or triggering actions and events, timed metadata offers a seamless synchronization of data with the media content.
As technology continues to advance, we can expect even more innovative use cases and improvements in timed metadata delivery, paving the way for exciting developments in the realm of online media streaming.
I hope you liked the blog. If you have any feedback about it, feel free to reach out to me on LinkedIn or Twitter.
If you haven't heard about Dyte yet, head over to dyte.io to learn how we are revolutionizing communication through our SDKs and libraries and how you can get started quickly on your 10,000 free minutes, which renew every month. You can reach us at support@dyte.io or ask our developer community if you have any questions.