TL;DR: This tutorial shows you how to create a live shopping app using the Dyte SDK, React, and Django. You'll learn how to set up a backend server with Django, integrate the Dyte video SDK into your React frontend, and build a support page that allows you to join live video calls with customers who need assistance. By the end of this tutorial, you'll have a working live shopping experience that will allow your customers to shop online in a way that's more similar to an in-store experience.
Introduction
In recent years, live shopping experiences have emerged as a popular way for businesses to connect with their customers in real time, creating a more engaging and interactive shopping experience. With the increasing demand for virtual shopping, there is a need to build reliable and scalable solutions to deliver seamless live shopping experiences.
In this technical blog, we will explore how to create a live shopping experience using Dyte SDK, React, and Django. Dyte video SDK is a powerful real-time communication platform that enables businesses to integrate video, audio, and chat functionalities into their applications. React, a popular JavaScript library, provides a flexible and efficient way to build dynamic user interfaces. Django, a high-level Python web framework, provides a robust and scalable backend for our application.
We will start by setting up our development environment, installing the necessary libraries and packages, and configuring our backend and frontend applications. We will then dive into the implementation of our live shopping application, including the integration of Dyte SDK and the creation of a dynamic user interface using React.
By the end of this tutorial, you will be able to:
- Set up a development environment and configure the necessary backend and frontend components
- Integrate Dyte SDK into your application to enable real-time communication features such as video, audio, and chat
- Build a dynamic user interface using React that provides a seamless shopping experience for your customers
Prerequisites to build a live shopping app
To follow along with this tutorial, you should have:
- Basic understanding of React and Django.
- A Dyte account. If you haven't done this already, you can create a free account on the Dyte website. Check out Dyte's Getting Started Guide for more information.

If you're new to React or Django, we recommend checking out their official documentation and completing some basic tutorials before diving into this blog post.
Additionally, make sure you have the following software installed on your machine:
- Node.js and NPM for building the React frontend
- Python 3 and pip for building the Django backend
With these prerequisites in place, you're ready to start building your live shopping application with Dyte SDK, React, and Django.
Setting up the backend
In this section, we'll set up the Django backend for our live shopping application. We'll start by creating a virtual environment for development, then create a new Django project and app. Finally, we'll add the necessary dependencies and create a Dyte app for integrating Dyte API.
Creating a Virtual Environment for Development
Before we start, let's create a virtual environment for our project. This will ensure that our dependencies are isolated from the global Python environment and make it easier to manage dependencies.
# Create a new virtual environment
python3 -m venv env

# Activate the virtual environment
source env/bin/activate
Starting a New Django Project
Let's create a new Django project using the startproject command.
# install django
pip install django

# Create a new Django project
django-admin startproject live_shopping_backend

# change directory
cd live_shopping_backend
This will create a new directory called live_shopping_backend with the basic structure for a Django project.
Adding Dependencies
Next, we need to add some dependencies to our project. In particular, we'll be using:
- Django REST framework for building the API endpoints
- requests for making HTTP requests to the Dyte API
- django-cors-headers for enabling cross-origin resource sharing (CORS)
We can install these dependencies using pip.
# Install dependencies
pip install djangorestframework requests django-cors-headers
Creating a live_shopping Django App
Now that we have our project set up and dependencies installed, we can create a new Django app.
# Create a new Django app
python manage.py startapp live_shopping
This will create a new directory called live_shopping with the basic structure for a Django app.
Creating a Dyte App
To use the Dyte APIs in our application, we need to create a Dyte app and obtain the org id and an API key. Follow the instructions in Dyte's Getting Started Guide to create a new app and obtain these.
Let's add these keys to our django settings file
# live_shopping_backend/settings.py

DYTE_API_BASE_URL = '<https://api.cluster.dyte.in/v2>'
DYTE_ORG_ID = 'YOUR_ORG_ID_HERE'
DYTE_API_KEY = 'YOUR_API_KEY_HERE'
DYTE_ORG_PRESET_NAME = "YOUR PRESET NAME HERE"
With these steps complete, we're ready to start building the API endpoints for our live shopping application!
Installing django apps
Update the settings.py file to include the live_shopping and dyte app.
# live_shopping_backend/settings.py
INSTALLED_APPS = [
	...
	"rest_framework",
	"corsheaders",
	"live_shopping",
]
Creating Dyte API client
Let's create a Dyte API client in our Django app using the requests. In this app, we will use the following Dyte APIs
- Create new meeting
- Add participant to meeting
- Refresh participant token
In the live_shopping django app create a new file dyte_api_client.py and add the following code.
# dyte/dyte_api_client.py
from urllib.parse import urljoin
import requests
from django.conf import settings

session = requests.Session()
session.auth = (settings.DYTE_ORG_ID, settings.DYTE_API_KEY)

class DyteAPIClient(object):
    def __init__(self):
        pass

    @classmethod
    def _create_url(cls, path):
        return urljoin(settings.DYTE_API_BASE_URL, path)

    @classmethod
    def _fetch(cls, request: requests.Request):
        prepared_request = session.prepare_request(request)
        response = session.send(prepared_request)
        response.raise_for_status()
        return response.json()["data"]

    @classmethod
    def create_meeting(
        cls, title: str, preferred_region: str, record_on_start: bool
    ) -> dict:
        data = {
            "title": title,
            "preferred_region": preferred_region,
            "record_on_start": record_on_start,
        }
        request = requests.Request(
            method="POST",
            url=cls._create_url("meetings"),
            json=data,
        )
        return cls._fetch(request)

    @classmethod
    def add_participant(
        cls, meeting_id: str, name: str, preset_name: str, custom_participant_id: str
    ) -> dict:
        data = {
            "name": name,
            "preset_name": preset_name,
            "custom_participant_id": custom_participant_id,
        }
        request = requests.Request(
            method="POST",
            url=cls._create_url(f"meetings/{meeting_id}/participants"),
            json=data,
        )
        return cls._fetch(request)

    @classmethod
    def refresh_participant_token(cls, meeting_id: str, participant_id: str) -> dict:
        request = requests.Request(
            method="POST",
            url=cls._create_url(
                f"meetings/{meeting_id}/participants/{participant_id}/token"
            ),
        )
        return cls._fetch(request)
In the above code,
Creating a client like this abstracts away the low-level details of making API requests, making it easier to use the API and reducing the amount of code needed to interact with it. This can lead to improved readability, maintainability, and overall code quality.
Creating the app
Let's create our live_shopping Django app to create and manage live video requests.
Creating models
To create our models, we'll use Django's built-in ORM to define the fields and relationships between our data. Let's create LiveVideoRequest model to store the user's request for a live video session with a support person. Add the following model to live_shopping/models.py
# live_shopping/models.py
from django.db import models
from django.contrib.auth import get_user_model

UserModel = get_user_model()

class LiveVideoRequest(models.Model):
	PENDING = "PENDING"
    ACTIVE = "ACTIVE"
    DONE = "DONE"
    STATUS_CHOICES = [
        (PENDING, "Pending"),
        (ACTIVE, "Active"),
        (DONE, "Done"),
    ]
	# Email and name of customer requesting the live session
    user_email = models.EmailField()
	user_name = models.CharField(max_length=128)
	# uuid of of the user's participant in the Dyte meeting
    user_dyte_participant_id = models.UUIDField(unique=True)
	# uuid of the dyte meeting used for the session
    dyte_meeting_id = models.UUIDField(unique=True)
	# foreign key to a staff user assigned for answer the request
    support_user = models.ForeignKey(UserModel, on_delete=models.DO_NOTHING, null=True)
	# uuid of the staff user's participant in the Dyte meeting
    support_user_dyte_participant_id = models.UUIDField(null=True)
	# current status of the session `Pending`, `Active` or `Done`
    status = models.CharField(max_length=10, choices=STATUS_CHOICES, default=PENDING)
	#
    feedback = models.TextField()
	# json field to store the details of the product i.e. id, title, description, image etc. We will use a fake product API . You minght want to make this a foreign key to your product in store.
    product = models.JSONField()
Now run the following command to create a migration for your model:
python manage.py makemigrations live_shopping
This will generate a migration file in the live_shopping/migrations directory.
Run the following command to apply the migration and create the necessary database tables:
python manage.py migrate
This will apply to all the pending migrations, including the one we just created.
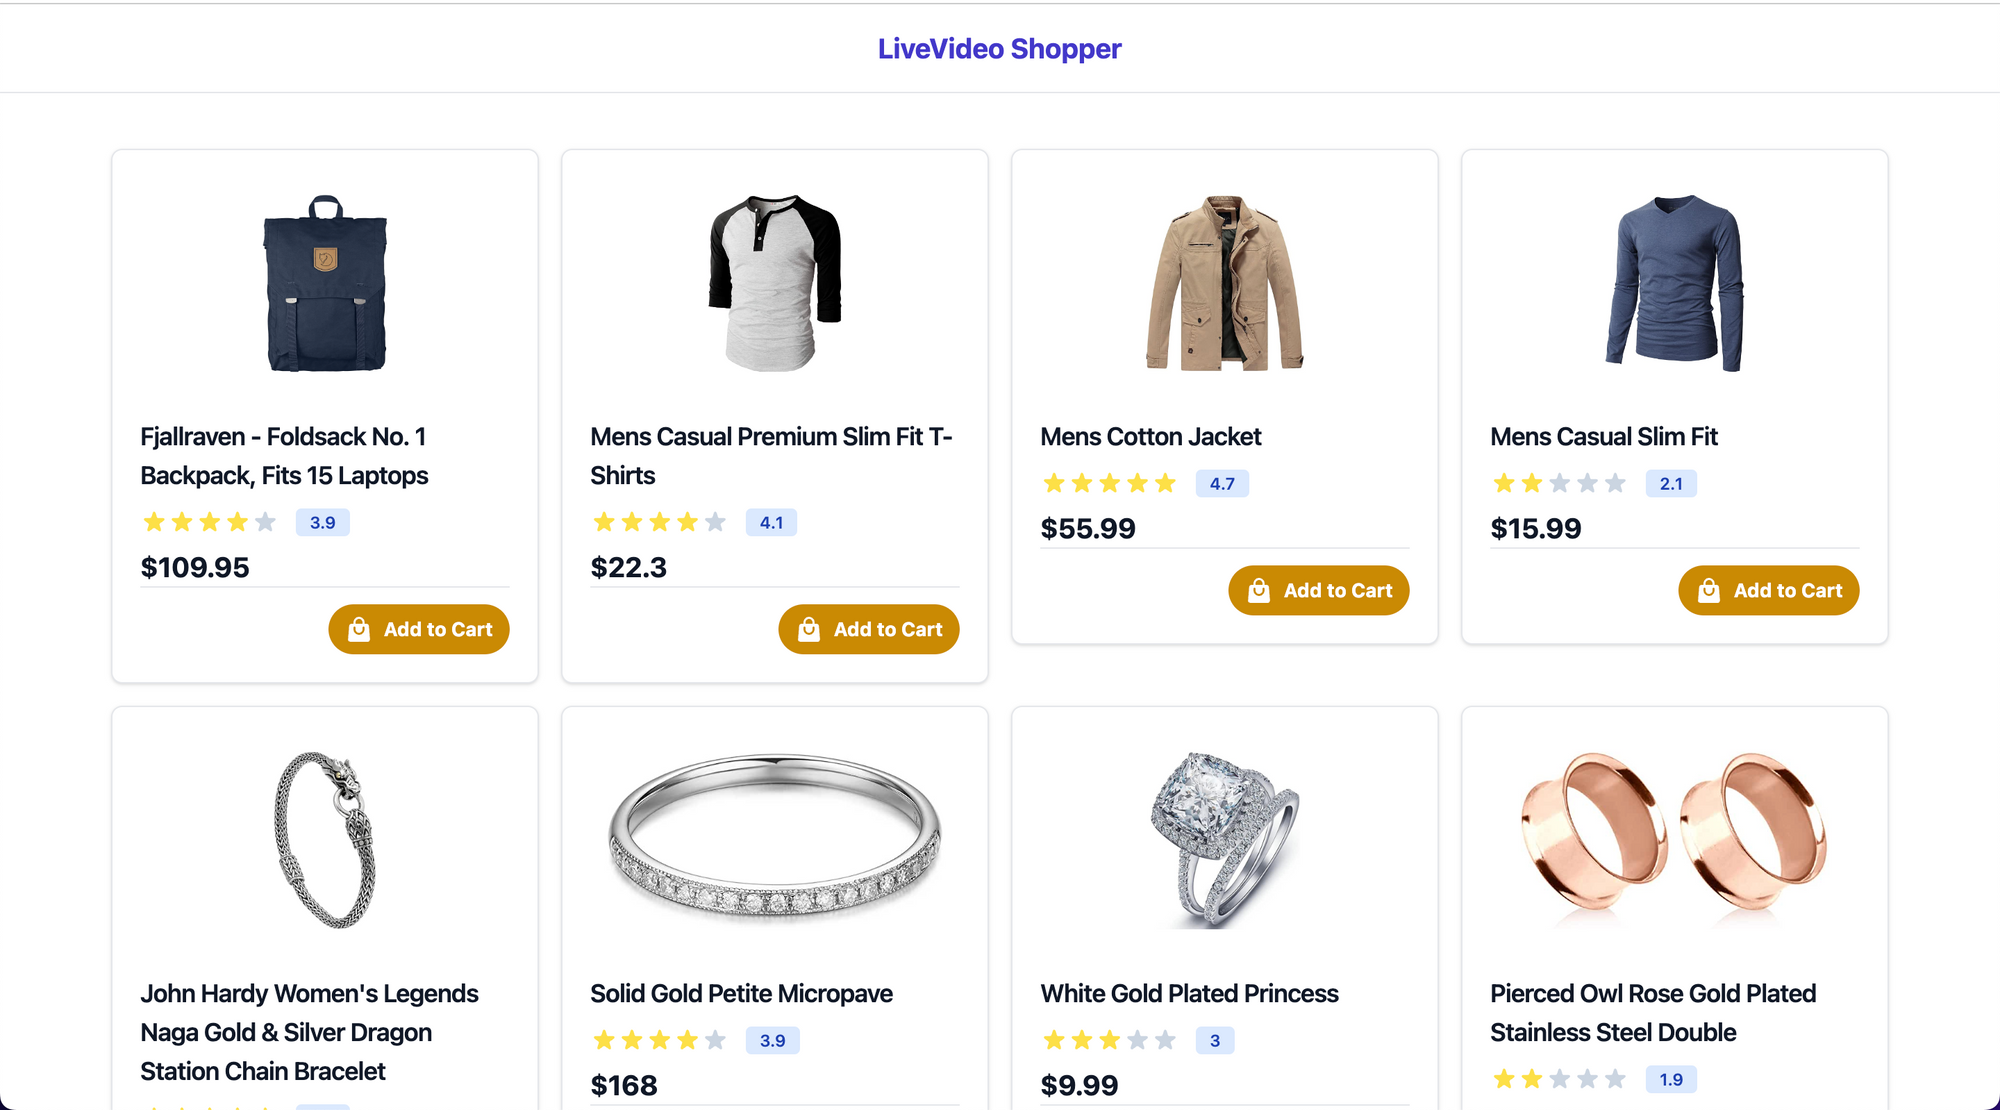
For brevity, we are skipping the models related to the product and user. We will use Fake Store API to simulate the store and Django provides appropriate models for User out-of-the-box.
Creating Serializers
Let us now create some serializers to convert the LiveVideoRequest model instances to JSON. These serializers will also help us validate the request data. Create a new file serializers.py in your live_shopping app and add the following serializers.
ProductSerializer
Since we are using Fake Store API, we want to make sure that each request comes with some data about the product. We will later use this to display details to our support user in frontend.
from rest_framework import serializers

class ProductSerializer(serializers.Serializer):
    id = serializers.IntegerField()
    title = serializers.CharField()
    image = serializers.URLField()
You would not need this if you are using a foreign key for the product, or you can customize this to your needs.
LiveVideoRequestSerializer
Update the live_shopping/serializers.py and add the following serializer.
...
from live_shopping.models import LiveVideoRequest
...
class LiveVideoRequestSerializer(serializers.ModelSerializer):
	feedback = serializers.CharField(required=False)
	product = ProductSerializer()

	class Meta:
		model = LiveVideoRequest
		fields = "__all__"
		read_only_fields = [
			"id", "status", "dyte_meeting_id", "support_user",
            "user_dyte_participant_id", "support_user_dyte_participant_id"
		]
We will use this to serializer LiveVideoRequest object and validate live video session requests. Refer DRF Serializers docs for more details on serializers.
Creating Views
Update the live_shopping/views.py file with the following code.
from django.shortcuts import get_object_or_404

from rest_framework.viewsets import ViewSet
from rest_framework.decorators import action
from rest_framework import status
from rest_framework.response import Response

from live_shopping.dyte_api_client import DyteAPIClient
from live_shopping.models import LiveVideoRequest
from live_shopping.serializers import LiveVideoRequestSerializer

class LiveVideoRequestViewSet(ViewSet):
	pass
Let's now define some methods to handle our live shopping requirements. For simplicity, we will not add any authentication and authorization checks. However, we strongly recommend adding these checks for any production implementation.
1. Creating new live video request
Update the views.py with:
...
class LiveVideoRequestViewSet(ViewSet):

    def create(self, request):
        data = request.data
        serializer = LiveVideoRequestSerializer(data=data)
        if serializer.is_valid():
            product = serializer.validated_data.get("product")
            user_email = serializer.validated_data.get("user_email")
            user_name = serializer.validated_data.get("user_name")
            dyte_meeting = DyteAPIClient.create_meeting(
                f"Live shopping for: {product.get('title')}",
                "ap-south-1",
                False,
            )
            participant = DyteAPIClient.add_participant(
                dyte_meeting["id"],
                user_name,
                preset_name="video_shoping",
                custom_participant_id=user_email,
            )
            live_request = LiveVideoRequest.objects.create(
                dyte_meeting_id=dyte_meeting["id"],
                user_name=user_name,
                user_email=user_email,
                status=LiveVideoRequest.PENDING,
                user_dyte_participant_id=participant["id"],
                product=data["product"],
            )
            live_request_serializer = LiveVideoRequestSerializer(live_request)
            return Response(
                live_request_serializer.data, status=status.HTTP_201_CREATED
            )

        return Response(serializer.errors, status=status.HTTP_400_BAD_REQUEST)
This method creates a new instance of LiveVideoRequest. It also uses the DyteAPIClient.create_meeting and DyteAPIClient.add_participant to create a new Dyte meeting and add our user as a participant. You will shortly use this API to request a video session from our frontend application.
2. List all the pending requests
Add the list method to LiveVideoRequestViewSet.
    def list(self, request):
        live_requests = LiveVideoRequest.objects.filter(status=LiveVideoRequest.PENDING)
        serializer = LiveVideoRequestSerializer(live_requests, many=True)
        return Response(serializer.data, status=status.HTTP_200_OK)
We will use this API to support the user's frontend to display a list of all the pending requests.
3. Fulfill the live shopping request
Let's add a custom action to assign a support user to the live shopping request.
    @action(methods=["post"], detail=True)
    def start(self, request, pk=None):
        live_request = get_object_or_404(LiveVideoRequest, pk=pk)
        if live_request.support_user_dyte_participant_id:
            token = DyteAPIClient.refresh_participant_token(
                live_request.dyte_meeting_id,
                live_request.support_user_dyte_participant_id,
            )
            return Response({"dyte_auth_token": token["token"]})
        participant = DyteAPIClient.add_participant(
            live_request.dyte_meeting_id,
            "Customer Support",
            "video_shoping",
            "customer_support",
        )
        live_request.support_user_dyte_participant_id = participant["id"]
        live_request.status = LiveVideoRequest.ACTIVE
        live_request.save()
        return Response(
            {"dyte_auth_token": participant["token"]}, status=status.HTTP_201_CREATED
        )
We are using the DyteAPIClient.add_participant to add a Customer Support participant in our Dyte meeting and returns dyte_auth_token for this participant.
4. Getting dyte participant token for the user
Now, let's add another custom action, user_token to retrieve dyte_auth_token for the customer. We will use this API to instantiate DyteClient for a user.
    @action(methods=["get"], detail=True, url_path="user-token")
    def user_token(self, request, pk=None):
        live_request = get_object_or_404(LiveVideoRequest, pk=pk)
        token = DyteAPIClient.refresh_participant_token(
            live_request.dyte_meeting_id, live_request.user_dyte_participant_id
        )
        return Response({"dyte_auth_token": token["token"]})
Refer DRF docs to learn more about adding authentication and permission to the ViewSet.
Creating Router
Let's now register a router for LiveVideoRequestViewSet. Create a new file urls.py in the live_shopping folder and add the router.
from rest_framework.routers import SimpleRouter

from .views import LiveVideoRequestViewSet

router = SimpleRouter()
router.register(r"live-requests", LiveVideoRequestViewSet, basename="live_requests")

urlpatterns = router.urls
Now update the live_shopping_backend/urls.py to include the API endpoints.
from django.urls import path, include

...
urlpatterns = [
	...
	path("live-shopping/", include("live_shopping.urls")),
	...
]
Setting up the React app
Let us now set up our frontend for the project using React and Typescript. We will use TailwindCSS for styling our components.
Create a new react app with TypeScript using Vite
To create a new React app with TypeScript using Vite, open your terminal and run the following commands:
npx create-vite-app live_shopping_frontend --template react-ts
cd live_shopping_frontend
npm install
This will create a new React app using Vite as the build tool with TypeScript support. The cd command changes your current directory to the newly created app's directory.
Install and configure TailwindCSS
To install TailwindCSS, run the following command in your terminal:
npm install -D tailwindcss postcss autoprefixer
npx tailwindcss init -p
This will install TailwindCSS, PostCSS, and Autoprefixer as dev dependencies in your project. The init the command will generate both tailwind.config.cjs and postcss.config.cjs.
Now, add the paths to all of your template files in your tailwind.config.cjs file.
/** @type {import('tailwindcss').Config} */
module.exports = {
  content: [
    "./index.html",
    "./src/**/*.{js,ts,jsx,tsx}",
  ],
  theme: {
    extend: {},
  },
  plugins: [],
}
Next, let's add the @tailwind directives for each of Tailwind’s layers to your ./src/index.css file. Import this css file in ./src/main.tsx as import ./index.css
Installing Dyte video SDK and other dependencies.
To install Dyte SDK, Axios, and react-router, run the following command in your terminal:
npm install --save @dytesdk/react-ui-kit @dytesdk/react-web-core axios react-router-dom
To configure react-router, add a new file ./src/router.tsx and add the following code:
import {createBrowserRouter} from 'react-router-dom';

export const router = createBrowserRouter([
//add your routes here
])
We will add routes in the upcoming sections. Next, update the App.tsx file with the following:
import React from 'react'
import './App.css'
import { RouterProvider } from 'react-router-dom'
import { router } from './router'

function App() {
  return (
    <div className='h-[100vh]'>
      <RouterProvider router={router} />
    </div>
  )
}

export default App
Testing the setup
To test your setup, run the following command in your terminal to start the development server:
npm run dev
This will start the development server on http://localhost:5173.
Creating API clients
Backend API client
Create a new folder /.src/api/ and add a file called backend.ts. This file will contain functions that make requests to your backend server. Following is an example:
import axios from 'axios';

const BASE_URL = 'http://localhost:8000';

export interface IProduct {
  id: number;
  title: string;
  rating: {rate: number},
  price: number,
  image?: URL
}

export interface CreateLiveVideoRequestData {
  user_name: string;
  user_email: string;
  product: IProduct;
}

export interface LiveVideoRequest {
  id: number;
  user_email: string;
  user_name: string;
  user_dyte_participant_id: string;
  support_user_dyte_participant_id: string | null;
  dyte_meeting_id: string;
  status: "PENDING" | "ACTIVE" | "DONE"
}

export const createLiveVideoRequest = async (
  data: CreateLiveVideoRequestData,
): Promise<LiveVideoRequest> => {
  const response = await axios.post(`${BASE_URL}/live-shopping/live-requests/`, data);
  return response.data;
};

export const listLiveVideoRequest = async (): Promise <LiveVideoRequest[]> => {
  const response = await axios.get(`${BASE_URL}/live-shopping/live-requests/`);
  return response.data;
}

export const startLiveVideoRequest = async(
  id: number
): Promise<{ dyte_auth_token: string }> => {
  const response = await axios.post(`${BASE_URL}/live-shopping/live-requests/${id}/start/`);
  return response.data
}

export const getUserToken = async(
  id: number
): Promise<{ dyte_auth_token: string }> => {
  const response = await axios.get(`${BASE_URL}/live-shoppong/live-request/${id}/user-token`);
  return response.data
}
Here we have created functions to interact with the Backend API to create, list and start a video request, and to retrieve dyte_auth_token for the user. You can add authentication details if you have implemented them in your backend.
Fake Product API client
Create a new file /.src/api/fakestore.ts. This file will contain functions that make requests to Fake Store API server. We will use this to simulate our store. Following is an example:
import axios from "axios";

const BASE_URL = 'https://fakestoreapi.com/'

export interface IProduct {
  id: number;
  title: string;
  rating: {rate: number},
  price: number,
  image?: URL
}

export const listProudcts = async (): Promise<IProduct[]> => {
  const response = await axios.get(`${BASE_URL}/products/`)
  return response.data;
}

export const getProduct = async (id: number): Promise<IProduct> => {
  const response = await axios.get(`${BASE_URL}/products/${id}/`);
  return response.data;
}
Here we have listProducts to get a list of products and getProduct to retrieve a single product detail.
With our API clients ready let's start building the interface for customers.
Creating consumer components
Creating the Dyte Meeting component
Let's create a LiveMeetingWrapper a component that takes an id, type, and dyte_auth_token (optional) as props. This component will fetch the auth token if it's not provided in the props and set up the Dyte client. We'll use the useEffect hook to fetch the token and set up the client. Create a file LiveMeetingWrapper.tsx in ./src/components/ and update the content with:
import { DyteProvider, useDyteClient } from "@dytesdk/react-web-core";
import React, { useEffect } from "react";
import { getUserToken, startLiveVideoRequest } from "../api/backend";
import { provideDyteDesignSystem } from "@dytesdk/react-ui-kit";
interface LiveMeetingWrapperProps {
  id: number;
  type: "user" | "support";
  dyte_auth_token?: string
}
const LiveMeetingWrapper: React.FC<LiveMeetingWrapperProps> = ({ id, type, dyte_auth_token }) => {
  const [meeting, initMeeting] = useDyteClient();
  const getDyteAuthToken = async (): Promise<string> => {
    if (type === 'user') {
      const auth_token = await getUserToken(id);
      return auth_token.dyte_auth_token
    } else {
      const auth_token = await startLiveVideoRequest(id)
      return auth_token.dyte_auth_token
    }
  }
  const onRoomLeft = () => {
    // Event handler to run on leaving the meeting.
  }
  const setupDyteMeeting = async () => {
    if (!dyte_auth_token) {
      dyte_auth_token = await getDyteAuthToken();
    }
    await initMeeting({
      authToken: dyte_auth_token,
      defaults: {
        audio: false,
        video: false
      }
    })
  }
  useEffect(() => {
    setupDyteMeeting();
  }, [])

  useEffect(() => {
    provideDyteDesignSystem(document.body, {
      theme: 'light',
    });
  }, []);

  useEffect(() => {
    if(meeting) {
      meeting.joinRoom();
      meeting.self.on('roomLeft', onRoomLeft);
      return () => {
          meeting.self.removeListener('roomLeft', onRoomLeft);
      }
  }}, [meeting]);

  return (
    <DyteProvider value={meeting} fallback={<div>Loading...</div>}>
    </DyteProvider>
  )
}
export default LiveMeetingWrapper;
Here we have used the getUserToken and startLiveVideoRequest API calls to our backend to fetch the auth token if not provided. We used useDyteClient to initiate the meeting after making sure the user has the dyte_auth_token.
We have also used DyteProvider. This will allow us to use Dyte hooks useDyteMeeting and useDyteSelector get DyteClient in our child components.
Let us now create a custom meeting component to render inside the <DyteProvider>. Create a new file in ./src/components/ called DyteMeeting.tsx and add the following content:
import { DyteCameraToggle, DyteChat, DyteControlbar, DyteGrid, DyteLeaveButton, DyteMicToggle } from "@dytesdk/react-ui-kit";
import { useDyteMeeting } from "@dytesdk/react-web-core";
import React from "react";
interface CustomDyteMeetingProps {
  onRoomLeft: () => void
}
const CustomDyteMeeting: React.FC<CustomDyteMeetingProps> = ({ onRoomLeft }) => {
  const { meeting } = useDyteMeeting();
  return (
    <div className="h-full w-full flex flex-row space-x-2">
      <div className="flex flex-col w-3/4">
        <DyteControlbar meeting={meeting} style={{ borderRadius: "10px" }} />
        <div className="flex-1">
          <DyteGrid meeting={meeting} size="sm" />
        </div>
        <div className="flex flex-row justify-center space-x-2">
          <DyteMicToggle meeting={meeting} />
          <DyteCameraToggle meeting={meeting} />
          <DyteLeaveButton onClick={() => meeting.leaveRoom()} />
        </div>
      </div>
      <div className="flex-1 bg-gray-800 text-white">
        <DyteChat meeting={meeting} style={{ borderRadius: "10px" }} />
      </div>
    </div>
  )
}
export default CustomDyteMeeting
Now, add the CustomDyteMeeting to our LiveMeetingWrapper.
...
<DyteProvider value={meeting} fallback={<div>Loading...</div>}>
	<CustomDyteMeeting onRoomLeft={onRoomLeft}/>
</DyteProvider>
...
In the CustomDyteMeeting component, we are using
useDyteMeeting()hook to get the meeting instance created earlier,- Dyte Components to create a meeting UI customized to our requirements.
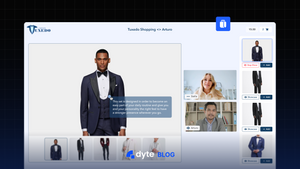
Creating the VideoShoppingModal component
Let's now create a Modal using the CustomDyteMeeting component. The modal will show the following details:
- Details of the product for which the user wants to raise a video shopping request.
- A form to get user details.
- Show the
CustomDyteMeetingcomponent once the user makes a request for video shopping.
We will also use this modal from the support view to answer the video shopping requests.
Create a new file VideoShoppingModal.tsx and add the following code:
import React, { FormEvent, useState } from "react";
import { createLiveVideoRequest } from "../api/backend";
import { IProduct } from "../types/product";
import LiveMeetingWrapper from "./LiveMeetingWrapper";

interface VideoShoppingModalProps {
  onClose: () => void,
  meetingId?: number,
  product: IProduct
}

const VideoShoppingModal: React.FC<VideoShoppingModalProps> = ({ onClose, product, meetingId }) => {

  const [email, setEmail] = useState('')
  const [name, setName] = useState('')
  const [videoRequestId, setVideoRequestId] = useState<number>()

  // use the following function to submit the user details and create a new live shopping request
  const submitVideoRequest = async (e: FormEvent) => {
    const video_request = await createLiveVideoRequest({
      user_email: email,
      user_name: name,
      product: product
    })
    setVideoRequestId(video_request.id);
  }

  const renderProductDetails = (product: IProduct) => {
// 	  Add code to render the product details here.
  }

  const renderUserForm = () => {
//    Add code to render user details form and
  }

  const renderMeeting = () => {
    if (meetingId) {
      return <div className="flex-1 h-full rounded">
        <LiveMeetingWrapper id={meetingId} type="support" onMeetingEnd={onClose}></LiveMeetingWrapper>
      </div>
    } else if (videoRequestId) {
      return <div className="flex-1 h-full rounded">
        <LiveMeetingWrapper id={videoRequestId} type="user" onMeetingEnd={onClose}></LiveMeetingWrapper>
      </div>
    }
    return <></>
  }

  return (
    <div className="fixed top-0 left-0 right-0 z-50 w-full h-screen p-4 overflow-x-hidden overflow-y-auto md:inset-0 h-[calc(100%-1rem)] md:h-full">
      <div className="fixed top-0 left-0 w-full h-full opacity-80 bg-slate-200">
	  {/* Transparent Overlay for modal*/}
	  </div>
		{/* Modal content */}
      <div className="relative mx-auto my-auto w-full h-[90%] max-w-[80%] opacity-100 bg-white rounded-lg shadow p-5">
        <div className="flex-1 flex flex-row justify-center align-center h-full space-x-2">
          <div className="w-1/3">
            {renderProductDetails(product)}
          </div>
          {!videoRequestId && !meetingId && renderUserForm()}
          {renderMeeting()}
        </div>
      </div>
    </div>
  )
}

export default VideoShoppingModal;
Here we pass support as type to the <LiveMeetingWrapper/> component if meetingId is passed in the props to VideoSoppingModal component.
VideoShoppingModal accepts two additional props:
product: Product details that can be used to render the product.onClose: A method that we will call when the meeting ends.
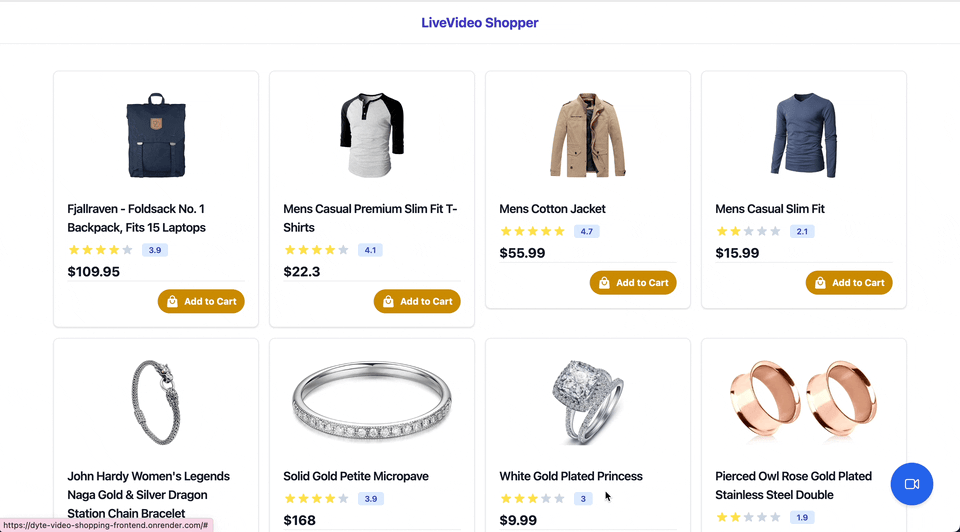
Creating a live shopping button component
As the last step for our user view, let's create a VideoButton which can be embedded in any page and would display VideoShoppingModal.
Create a new file VideoButton.tsx in ./src/components/ with the following code.
import React, { useState } from "react";
import { IProduct } from "../types/product";
import VideoShoppingModal from "./VideoShoppingModal";

interface VideoButtonProps {
  getProductDetails: () => IProduct
}

const VideoButton: React.FC<VideoButtonProps> = ({ getProductDetails }) => {
  const [showModal, setShowModal] = useState<boolean>(false);
  const product = getProductDetails();

  return (
    <div>
      <div
        onClick={() => setShowModal(true)}
        className="cursor-pointer shadow-md fixed bottom-10 right-10 rounded-full bg-blue-600 h-16 w-16 text-white flex justify-center items-center text-3xl">
        <svg xmlns="<http://www.w3.org/2000/svg>" fill="none" viewBox="0 0 24 24" strokeWidth={1.5} stroke="currentColor" className="w-6 h-6">
          <path strokeLinecap="round" d="M15.75 10.5l4.72-4.72a.75.75 0 011.28.53v11.38a.75.75 0 01-1.28.53l-4.72-4.72M4.5 18.75h9a2.25 2.25 0 002.25-2.25v-9a2.25 2.25 0 00-2.25-2.25h-9A2.25 2.25 0 002.25 7.5v9a2.25 2.25 0 002.25 2.25z" />
        </svg>
      </div>
      {
        product && showModal &&
        <VideoShoppingModal
          onClose={async () => setShowModal(false)}
          product={product}
        />
      }
    </div>
  )
}

export default VideoButton;
The getProductDetails a prop is a function that will be called to get the product details.
Integrating on Product Page
With all the components ready, we can now integrate VideoButton on the product page to display our video shopping button. Following is a sample.
import React, { useEffect, useState } from "react";
import { useParams } from "react-router-dom";
import VideoButton from "../../components/VideoButton";
import { IProduct } from "../../types/product";
const ProductPage: React.FC = () => {
  const [product, setProduct] = useState<IProduct>()
  const params = useParams()
  const product_id = params.id
  const fetchProduct = async () => {
    const product = await getProduct(product_id)
    setProduct(product)
  }
  useEffect(() => {
    fetchProduct()
  }, [])
  const renderProduct = (product: IProduct) => {
//     Write code to render the product page
  }
  return (
    <div className="h-screen container w-5/6 mx-auto">
      {product && renderProduct(product)}
      {product && <VideoButton getProductDetails={() => product} />}
    </div>
  )
}
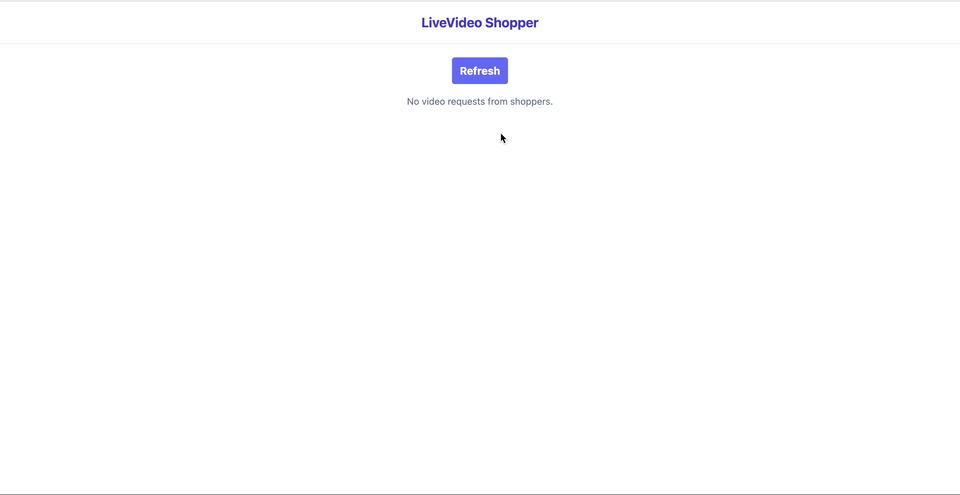
Creating support page
In this section, we'll create a React page that displays a list of currently pending live video requests. We'll use the useEffect hook to fetch the list of requests from our Django backend and the VideoShoppingModal component from the previous section to connect support users to customers.
Create a file /.src/pages/support/LiveRequests.tsx. This file will define our LiveRequestsPage.
import React, { useEffect, useState } from "react";
import { listLiveVideoRequest, LiveVideoRequest } from "../../api/backend";
import VideoShoppingModal from "../../components/VideoShoppingModal";

const LiveRequestPage: React.FC = () => {
  const [liveRequests, setLiveRequests] = useState<LiveVideoRequest[]>([])
  const [activeLiveVideoRequest, setActiveLiveVideoRequest] = useState<LiveVideoRequest>()
  const [showModal, setShowModal] = useState<boolean>(false)

  const startMeeting = (videoRequest: LiveVideoRequest) => {
    setActiveLiveVideoRequest(videoRequest);
    setShowModal(true)
  }

  useEffect(() => {
    const getliveRequests = async () => {
      const resp = await listLiveVideoRequest();
      setLiveRequests(resp)
    }
    getliveRequests();
  }, [])

  return (
    <div className="max-w-lg flex flex-col space-y-4 mx-auto rounded">
      {
        liveRequests.map((req: LiveVideoRequest) => {
          return (
            <div key={req.id} className="p-5 border flex flex-row justify-between">
              <div className="text-xl font-bold">{req.product.title}</div>
              <div>
                <button onClick={() => startMeeting(req)} className="rounded-full bg-indigo-600 text-white px-3 py-2">Join</button>
              </div>
            </div>
          )
        })
      }
      {showModal && activeLiveVideoRequest &&
        <VideoShoppingModal
          onClose={() => setShowModal(false)}
          meetingId={activeLiveVideoRequest.id}
          product={activeLiveVideoRequest.product}
        />
      }
    </div>
  )
}

export default LiveRequestPage
On this page, we fetch the pending video requests using listLiveVideoRequest method defined earlier. We also define startMeeting a function that sets an active video request and opens the VideoShoppingModal.
Conclusion
In this tutorial, we showed you how to create a live shopping app using the Dyte SDK, React, and Django. By following the steps outlined in this tutorial, you should now have a working live shopping experience that's powered by Dyte.
🧑💻 You can try out the live shopping app, check the user view to initiate the video call, and the admin view to see all incoming requests and join the call.
You can find the source code on GitHub.
Future enhancements and improvements.
Here are some possible future enhancements that you might consider
- Adding authentication and authorization to restrict access to the support page and live video calls.
- Customizing the
VideoShoppingModalcomponent to include additional features like product recommendations or shared shopping carts. - Enhancing the backend to include more sophisticated request processing, analytics, or integrations with third-party services.
So what's next? Head on over to Dyte.io and let your creative juices flow! Start building your own collaborative applications and you might just create the next big thing! 🚀