Introduction
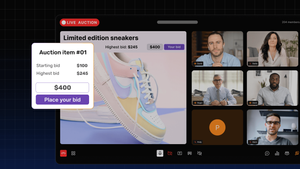
With virtual meetings becoming popular, we are looking at various use cases and scenarios where they can be used. We have already covered how Dyte video SDK can be used for creating a Live Shopping App or building a Code Sharing Platform.
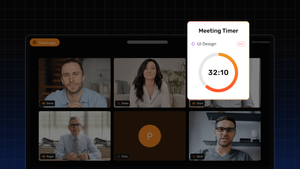
A few more scenarios where virtual meetings and their customizations play an essential role are healthcare and ed-tech. For example, we can have a 1:1 private meeting between a doctor and a patient, and this meeting could be timed, meaning it will last only 60 minutes. Similarly, we can have a classroom session with a teacher and multiple students, which can be limited to 45 minutes.
So, let's build these timed meetings. In the sample we are creating here, we will ensure the user can set up a meeting with a specific duration. Once two participants join the meeting, the countdown timer will start. As the timer is ticked (or completed), we will kick the participants out and close the session.
Setup
We have covered the importance of the backend in building applications around Dyte. It helps secure (authentication and authorization), manage, and maintain Dyte meetings. We will extend the same ASP.NET backend to build timed meetings. For the frontend, we will use the React framework.
The Backend
We will extend the Create Meeting API from the backend we used before to include meeting duration. Ideally, we would want to store the meeting duration and details in our database, in this case, Azure Table Storage - a NoSQL data store.
[HttpPost(Name = "CreateMeeting")]
        public async Task<IActionResult> Create(Meeting meeting)
        {
            // Check the provided meeting details
            if (meeting == null)
                return StatusCode(400);

            var meetingData = JsonSerializer.Serialize(new {title = meeting.Title});
            var content = new StringContent(meetingData, Encoding.UTF8, "application/json");

            var client = new HttpClient();
            var authToken =
                Convert.ToBase64String(Encoding.UTF8.GetBytes($"{Globals.OrganizationId}:{Globals.ApiKey}"));

            client.BaseAddress = new Uri("https://api.cluster.dyte.in/");
            client.DefaultRequestHeaders.Authorization = new AuthenticationHeaderValue("Basic", authToken);

            //Create the meeting using Dyte REST APIs
            var responseMessage = await client.PostAsync("/v2/meetings/", content);
            var responseCode = responseMessage.EnsureSuccessStatusCode();
            if (responseCode.StatusCode != HttpStatusCode.Created)
            {
                return BadRequest(responseCode);
            }

            var responseData = await responseMessage.Content.ReadAsStringAsync();
            var responseObject = JsonSerializer.Deserialize<MeetingsResponse>(responseData);

            //Store the meeting using Azure Table Storage
            var tableClient = new TableClient(Globals.AzureStorageUri, Globals.AzureTableForMeetings);
            await tableClient.CreateIfNotExistsAsync();
            var entity = new TableEntity(Globals.OrganizationId, responseObject?.Data?.MeetingId)
            {
                { "Name", meeting?.Title},
                { "CreatedOn", responseObject?.Data?.CreatedOn},
                { "IsRecordOnStart", responseObject?.Data?.IsRecordOnStart},
                { "Duration", (meeting?.Duration * 60)}
            };

            await tableClient.AddEntityAsync(entity);
            //Return created meeting object
            return Created(string.Empty, responseObject);
        }
Once the meeting is created, we can add participants using the Add Participant API.
We would need to add one extra API in this backend to send meeting details with duration, and we will call this API when there are two participants in the meeting.
[HttpGet]
        public async Task<IActionResult> Get(string meetingId)
        {
            var client = new HttpClient();
            var authToken =
                Convert.ToBase64String(Encoding.UTF8.GetBytes($"{Globals.OrganizationId}:{Globals.ApiKey}"));

            client.BaseAddress = new Uri("https://api.cluster.dyte.in/");
            client.DefaultRequestHeaders.Authorization = new AuthenticationHeaderValue("Basic", authToken);
            var tableClient = new TableClient(Globals.AzureStorageUri, Globals.AzureTableForMeetings);

            var queryResultsFilter = tableClient.Query<TableEntity>(e => e.PartitionKey == Globals.OrganizationId && e.RowKey == meetingId);
            if (queryResultsFilter.Count() > 0)
                return Ok(new { title = queryResultsFilter?.FirstOrDefault()["Name"], duration = queryResultsFilter?.FirstOrDefault()["Duration"] });
            return NotFound();
        }
Finally, when the timer is ticked, we want to kick all participants out and close the meeting. The following code snippet will do it for us.
[HttpPost]
        public async Task<IActionResult> Create(Completion meetingId)
        {
            if(meetingId == null)
                return StatusCode(400);


            var content = new StringContent(meetingId.MeetingId, Encoding.UTF8, "application/json");

            var client = new HttpClient();
            var authToken =
                Convert.ToBase64String(Encoding.UTF8.GetBytes($"{Globals.OrganizationId}:{Globals.ApiKey}"));

            client.BaseAddress = new Uri("https://api.cluster.dyte.in/");
            client.DefaultRequestHeaders.Authorization = new AuthenticationHeaderValue("Basic", authToken);

            //Create the meeting using Dyte REST APIs
            var responseMessage = await client.PostAsync($"/v2/meetings/{meetingId.MeetingId}/active-session/kick-all",null);
            var responseCode = responseMessage.EnsureSuccessStatusCode();
            if (responseCode.StatusCode != HttpStatusCode.Created)
            {
                return BadRequest(responseCode);
            }

            var responseData = await responseMessage.Content.ReadAsStringAsync();
            return Ok(responseData);
        }
The Frontend
We are using React for the frontend, and this app will call APIs from the backend project.
We can write our own component or use an existing one for countdown purposes. We are using the react-countdown component for simplicity, which is also helpful in this context.
When we create a meeting and navigate to join the same, along with the auth token, we pass in the meeting duration.
navigate('/lobby', { state: { authToken: authToken, meetingDuration: meetingResponse.data.duration } });
When initializing the DyteMeeting, we check for authToken and meetingDuration dependencies and attach those to the window object within the useEffect hook. Also, we ensure to start the timer only when at least two participants are in the meeting.
useEffect(() => {
        initMeeting({
            authToken: location.state.authToken,
            defaults: {
                audio: false,
                video: false,
            },
        }).then(m => {
            window.meeting = m;
            window.duration = location.state.meetingDuration;
            window.ref = myRef;
            m.joinRoom();
            m.participants.joined.on('participantJoined', (participant) => {
                if (m.participants.count >= 1) {

                    myRef.current.start();
                }
            });

        });
    }, [location.state]);
The countdown timer from react-component accepts a child component which can be invoked when the timer is ticked. In our case, we display a DyteDialog, and on closing this dialog, we close the meeting. The complete HTML for the lobby looks like this:
<div className="dyte-meeting">
        <DyteProvider value={meeting} >
            <DyteParticipantsAudio meeting={meeting} />
            <DyteNotifications
                meeting={meeting}
                config={{
                    config: {
                        notifications: ['chat', 'participant_joined', 'participant_left'],
                        notification_sounds: ['chat', 'participant_joined', 'participant_left'],
                        participant_joined_sound_notification_limit: 10,
                        participant_chat_message_sound_notification_limit: 10,
                    },
                }}
            />
            <DyteHeader meeting={meeting}>
                <div style={{ backgroundColor: 'white' }}>
                    <span>Duration: { duration}</span>
                    <span>This meeting will self close in:</span>
                    <Countdown autoStart={false} ref={myRef} onMount={mountHandler} controlled={true}>
                        <Completion />
                    </Countdown>
                </div>
            </DyteHeader>
            <div className="grid-container">
                <DyteGrid meeting={meeting} style={{ height: '100%' }} />
            </div>
            <div class="controlbar">
                <DyteMicToggle meeting={meeting} />
                <DyteCameraToggle meeting={meeting} />
                <DyteSettingsToggle meeting={meeting} />
            </div>
            <DyteDialog open={showDialog} onDyteDialogClose={closeHandler}>
                <div style={{ width: '512px', backgroundColor: '#000',color: '#fff', padding: 12,borderRadius: 8,}}>
                    <h3>Dyte Timed Meeting!</h3>
                    <p style={{ marginBottom: 0 }}>This meeting is now ended!</p>
                </div>
            </DyteDialog>
        </DyteProvider>
    </div>
And that's pretty much it. Now, let's first hit debug on the backend project and npm start for the frontend.
A Timed Meeting Demo
We can test the sample by joining from two different tabs and observing the behavior of our timed meeting.
Conclusion
In this blog post, we talked about building timed meetings. We have already covered 1:1 meetings in building the backend for the video calling apps blog post. Now you can think of different combinations and scenarios wherein Dyte video SDK can be used for these use cases mentioned above and more. And trust us when we say this, the possibilities are endless!